How to Properly Install PEX Pipe For A Leak-Free Home

Installing PEX pipe professionally done by Leone Plumbing

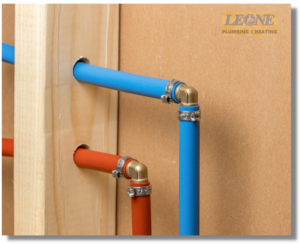
Installing the right plumbing system is essential for a leak-free and hassle-free home. And when it comes to choosing the best piping material, PEX (cross-linked polyethylene) pipes are gaining popularity for all the right reasons. With their excellent flexibility, durability, and resistance to freezing, PEX pipes have become a preferred choice for homeowners and contractors alike. But proper installation is key to ensuring their leak-free performance. In this comprehensive guide, we will walk you through the step-by-step process of installing PEX pipes, from preparing the materials to connecting the fittings. We will also discuss the importance of using the right tools and techniques to achieve secure and reliable connections.

Advantages Of Using PEX Pipe For Plumbing

Another advantage of PEX pipe is its durability. Unlike copper, PEX pipe does not corrode or develop pinhole leaks over time. It is also resistant to scale build-up, ensuring consistent water flow and reducing the need for maintenance. PEX pipe is also quieter compared to metal pipes, as it absorbs water hammer and minimizes noise transmission. Moreover, PEX pipe is less expensive than copper, making it a cost-effective choice for plumbing projects.

Types Of PEX Pipe

Before you begin your PEX pipe installation, it is important to understand the different types and sizes of PEX pipe available. PEX pipe comes in three main types: PEX-A, PEX-B, and PEX-C. Each type has its unique characteristics and uses.

  • PEX-A is the most flexible type of PEX pipe and can withstand repeated bending without losing its shape. This makes it ideal for installations that require many bends and curves.
  • PEX-B is slightly less flexible than PEX-A but still offers excellent durability and reliability.
  • PEX-C is the least flexible type, but it is also the most affordable option.

PEX Pipe Sizes

In terms of sizes, PEX pipe is available in various diameters, commonly ranging from 3/8 inch to 1 inch. The size you choose will depend on the water flow requirements of your plumbing system. It is important to select the appropriate size to ensure proper water pressure and flow.

When purchasing PEX pipe, be sure to check for industry certifications, such as the NSF (National Sanitation Foundation) certification, to ensure that the pipe meets quality standards and is suitable for potable water applications.

Step-By-Step Guide To Installing PEX Pipe

Before you begin installing PEX pipes, there are a few important steps you need to take to ensure a smooth and efficient installation process. Here’s what you need to do:

1. Plan your plumbing system: Determine the layout of your plumbing system, including the location of fixtures, supply lines, and drains. This will help you calculate the amount of PEX pipe and fittings you will need for the project.

2. Shut off the water supply: Before you start any plumbing work, make sure to shut off the main water supply to your home. This will prevent any accidents or water damage during the installation process.

3. Remove old pipes if necessary: If you are replacing an existing plumbing system, you will need to remove the old pipes before installing the PEX pipe. Follow proper procedures for removing old pipes, such as draining the water and using appropriate tools.

4. Prepare the work area: Clear the work area of any obstacles and ensure you have enough space to maneuver and work comfortably. Lay down protective sheets or tarps to protect the flooring or surfaces from any potential damage.

By properly preparing for the PEX pipe installation, you can minimize any potential issues and ensure a successful and efficient installation process.

Tips For Avoiding Leaks During PEX Pipe Installation Tools for Installing PEX Pipe

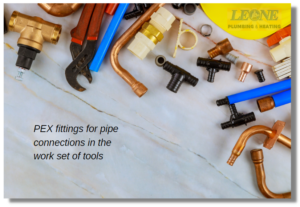
Now that you have prepared for the PEX pipe installation, it’s time to dive into the step-by-step process. Follow these instructions to properly install PEX pipe for a leak-free plumbing system:

1. Measure and cut the PEX pipe: Measure the length of the pipe needed for each section of the plumbing system. Use a PEX cutting tool to make clean and straight cuts. Be sure to deburr the cut ends to remove any rough edges.

2. Insert the fittings: Slide a PEX sleeve onto the end of the PEX pipe. Insert the PEX fitting into the end of the pipe until it reaches the shoulder of the fitting. Ensure that the fitting is fully inserted and seated properly.

3. Crimp the connection: Use a PEX crimping tool to crimp the PEX ring around the fitting. Position the crimping tool over the crimp ring and squeeze the handles firmly until the tool is released. Repeat the crimping process on the other end of the fitting to create a secure connection.

4. Secure the PEX pipe: Use pipe hangers to secure the PEX pipe to the framing or other structural elements. Make sure to leave enough room for the pipe to expand and contract with temperature changes.

5. Connect the PEX pipe to fixtures and appliances: Use PEX fittings to connect the PEX pipe to fixtures, such as faucets and toilets, as well as appliances, such as water heaters and washing machines. Follow the manufacturer’s instructions for each specific connection.

6. Install the PEX manifold: If you are using a PEX manifold, install it in a central location and connect the PEX pipes to the manifold using appropriate fittings. The manifold will allow you to control the flow of water to different areas of the plumbing system.

7. Insulate the PEX pipes: Wrap pipe insulation around the PEX pipes to prevent freezing and reduce heat loss. Pay special attention to pipes located in unheated areas or near exterior walls.

By following these step-by-step instructions, you can ensure a proper and secure installation of PEX pipe for a leak-free plumbing system.

Maintaining And Troubleshooting PEX Pipe Systems

Once you have completed the installation of the PEX pipe, it is important to test and inspect the connections to ensure their integrity. Follow these steps to test and inspect the PEX pipe connections:

1. Close all fixtures and appliances: Make sure all faucets, toilets, and other fixtures are turned off. This will isolate the PEX pipe system and allow you to test the connections effectively.

2. Pressurize the system: Use a pressure gauge and a suitable pump to pressurize the PEX pipe system. Follow the manufacturer’s instructions for the specific pressure requirements of your system.

3. Inspect for leaks: Once the system is pressurized, visually inspect all the connections for any signs of leaks. Check the fittings, crimps, and sleeves for any water seepage or drips. If you notice any leaks, mark the location for repair.

4. Repair any leaks: If you find any leaks during the inspection, you will need to repair them immediately. Cut out the faulty section of the PEX pipe and replace it with a new one. Follow the proper procedures for cutting and connecting the new pipe.

5. Re-test the system: After repairing any leaks, re-pressurize the system and re-inspect all the connections. Make sure there are no new leaks and that all the connections are secure and leak-free.

By testing and inspecting the PEX pipe connections, you can identify and address any leaks before they cause significant damage to your plumbing system or property.

Installing PEX Pipe With A Professional

In the event of any problems or issues with installing your PEX pipe system, it is recommended to consult a professional plumber or the manufacturer for troubleshooting and repair guidance. As a team of experienced professional plumbers in the Rochester New York area, we are committed to providing you with quality PEX pipe installation. For your PEX pipe installation needs, contact us, and we are here to help!

Read More

DIY Guide On How To Relight A Pilot Light On Your Water Heater

how to relight pilot light on water heater instructions by Leone Plumbing
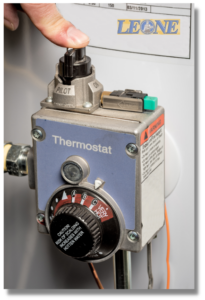
Is your water heater producing lukewarm or cold water? Before you pick up the phone to call a professional, you might be able to fix the problem yourself. In this DIY guide, we’ll show you how to relight the pilot light on your water heater step by step. With just a few simple tools and a little know-how, you can potentially save yourself time and money. In this comprehensive guide, we’ll cover everything you need to know, from identifying whether your pilot light is out to safely relighting it.

Signs That Your Water Heater Pilot Light Needs Relighting

Before you figure out how to relight a pilot light on the water heater you need to observe the signs. Here are some common signs that your pilot light may be out and needs relighting:

1. No hot water:

If you turn on the hot water tap and only get cold or lukewarm water, it’s likely that your pilot light is out. Without a working pilot light, the burner won’t ignite, resulting in no hot water.

2. Pilot light won’t stay lit:

If you’ve noticed that your pilot light keeps going out, even after relighting it, there may be an underlying issue causing the flame to extinguish. This could be due to a faulty thermocouple or a problem with the gas supply.

3. Gas smell:

If you detect a strong odor of gas near your water heater, it’s crucial to act quickly. A gas leak can be hazardous, so turn off the gas supply and ventilate the area immediately. In this case, do not attempt to relight the pilot light yourself and call a professional right away.

Important Note To Remember: 

These signs indicate that you may need to relight your pilot light, but it’s essential to follow the proper safety precautions before attempting to do so.

Safety First Before You Relight The Pilot Light On Your Water Heater

Before you begin the process of relighting your water heater pilot light, it’s crucial to take the following safety precautions:

1. Turn off the gas supply:

Locate the gas shut-off valve near your water heater. Turn the valve to the “off” position to cut off the gas supply. This step is crucial to prevent any gas leaks or accidents while you work on relighting the pilot light.

2. Allow time for gas to dissipate:

After turning off the gas supply, it’s important to allow some time for any remaining gas to dissipate. Open windows or doors to ventilate the area and ensure there are no lingering gas fumes.

3. Read the manufacturer’s instructions:

Each water heater may have slightly different instructions for relighting the pilot light. Take the time to read the manufacturer’s instructions carefully to ensure you understand the process and any specific safety considerations.

Step-by-step Guide To Relighting A Water Heater Pilot Light

Now that you’ve taken the necessary safety precautions, let’s dive into the step-by-step process of relighting your water heater pilot light:

Step 1: Access the pilot light assembly

First, locate the access panel on your water heater. This panel is typically located near the bottom of the unit. Next, remove the panel by unscrewing or lifting it, depending on the type of water heater you have. Once the panel is removed, you should have clear access to the pilot light assembly.

Step 2: Locate the pilot light and gas control knob

Look for the gas control knob on the front of the water heater. This knob is usually labeled and will have settings such as “on,” “off,” and “pilot.” Then set the gas control knob to the “off” position. This ensures that the gas supply to the pilot light is shut off.

Step 3: Wait for the gas to dissipate

After turning the gas control knob to the “off” position, give the gas a few minutes to dissipate. This will help ensure there are no lingering gas fumes when you relight the pilot light.

Step 4: Locate the pilot light

Look for the pilot light assembly near the bottom of the water heater. It usually consists of a small tube with a metal tip. Next, locate the pilot light orifice, which is a small opening where the gas is released to ignite the flame.

Step 5: Light the pilot light

With a long-reach lighter or fireplace match in hand, carefully bring the flame close to the pilot light orifice. While holding the flame near the orifice, turn the gas control knob to the “pilot” position. Press the knob down and hold it in this position to allow gas to flow to the pilot light. Continue to hold the knob down while you ignite the gas by bringing the flame closer to the orifice. Once the pilot light is lit, continue holding the knob down for about 20-30 seconds to ensure the flame stays lit. After 20-30 seconds, release the knob and the pilot light should remain lit.

Step 6: Test the pilot light

Turn the gas control knob to the “on” position. Then, return the access panel to its original position and secure it. Wait for a few minutes for the water heater to heat up. Lastly, turn on a hot water tap to check if the hot water is flowing consistently. If the water is hot, then the pilot light is successfully relit.

Disclaimer:

While it is a good idea to do things DIY, it can be a dangerous task for people who are not experienced. We recommend having a licensed and insured technician assist with this job.

When To Call A Professional For Help With Relighting The Pilot Light

Good job if you were able to successfully relight your water heater pilot light on your own. However, if you encounter any issues during the process or if the pilot light continues to go out, there may be underlying problems that require professional assistance. If things get out of hand, it’s time to pick up the phone and call an expert plumber to fix the issue. So don’t look anywhere! Call Rochester New York’s best plumbers to help you. Contact us right away if you need help in fixing your water heater.
Read More

The Advantages and Process of Drain Camera Inspection Services

Leone Plumbing drain camera inspection services in Rochester New YorkWhen it comes to plumbing issues, finding the root cause can often be a challenge. That’s where drain camera inspection services come in. By peering into the depths of your pipes with the help of advanced camera technology, these services offer a clear view of what’s happening underground. Using state-of-the-art equipment, drain camera inspections provide homeowners and businesses with a thorough assessment of their plumbing systems. This advanced approach allows for quicker identification of clogs, leaks, and other potential problems, saving time and money in the long run. By combining cutting-edge technology with expert analysis, these services empower individuals to make informed decisions about their plumbing systems, leading to more efficient and cost-effective solutions.

The Advantages Of Drain Camera Inspection Services

Drain camera inspection services offer several advantages over traditional plumbing diagnostic methods.

Provide Accurate And Precise Results

Firstly, they provide accurate and precise results. The high-resolution cameras used in drain camera inspections capture clear images and videos of the inside of pipes, allowing professionals to identify the exact location and nature of the problem. This eliminates the guesswork involved in traditional diagnostic approaches and ensures that the correct solution is implemented from the start.

Eliminate Invasive Procedures

Secondly, drain camera inspections eliminate the need for invasive procedures like digging or tearing down walls. In the past, diagnosing plumbing issues often required destructive methods, resulting in additional costs and inconvenience for homeowners. With drain camera inspection services, professionals can visually inspect the pipes without causing any damage to the property. This non-invasive approach not only saves time and money but also minimizes disruption to the daily lives of individuals.

Provide Thorough And Accurate Diagnostics

The detailed images and videos captured during drain camera inspections provide transparency and thorough documentation. Homeowners and businesses can view the real-time footage or saved recordings, allowing them to see the condition of their pipes firsthand. This transparency builds trust between the service provider and the customer and ensures that all parties involved have a clear understanding of the problem and its solution. Additionally, the documented evidence can be useful for insurance claims or future reference.

Common Issues Detected By Drain Camera Inspections

Drain camera inspections are capable of identifying a wide range of plumbing issues that may not be easily detectable through other means. Some of the most common issues detected by these inspections include:

1. Clogs:

Drain camera inspections can pinpoint the exact location and cause of clogs within the pipes. Whether it’s a buildup of grease, hair, or foreign objects, the camera provides a clear view of the obstruction, enabling professionals to determine the most appropriate method of removal.

2. Leaks:

Pipe leaks can be difficult to detect, especially if they are hidden behind walls or underground. Drain camera inspections allow for visual confirmation of leaks, helping professionals identify the extent of the damage and plan the necessary repairs.

3. Cracks and Damage:

Over time, pipes can develop cracks, fractures, or other forms of damage that may go unnoticed without a drain camera inspection. By examining the interior of the pipes, professionals can identify any structural issues and take appropriate action to prevent further damage or leaks.

4. Root Intrusions:

Tree roots tend to grow towards sources of water, including underground pipes. These root intrusions can cause blockages and damage to the pipes, leading to reduced water flow and potential leaks. Drain camera inspections can detect and locate these root intrusions, allowing for targeted root removal and pipe repair.

5. Misaligned or Collapsed Pipes:

Drain camera inspections can reveal any misaligned or collapsed sections of pipes. This information is crucial for determining the best course of action, whether it’s repairing the affected section or replacing the entire pipe.

The Importance Of Regular Drain Camera Inspection Services

Drain camera inspections involve a systematic process that utilizes specialized equipment and skilled professionals. Scheduling a regular drain camera inspection service is one way that you can prevent the worst plumbing issues or repair those ongoing and recurring problems on your drain. If you are looking for a tested and proven drain camera inspection service in Rochester, New York our team of expert plumbers is ready to help you! Contact us today to book an appointment.
Read More

How To Unfreeze Frozen Pipes Safely And Efficiently

Leone Plumbing and Heating How To Unfreeze Frozen Pipes Safely And Efficiently 
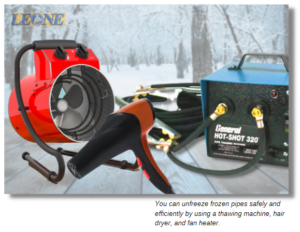
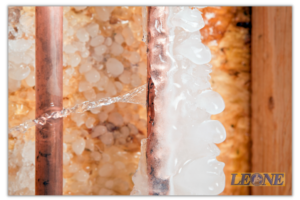
One of the problems that you may encounter during the winter season is frozen water pipes. If the weather is cold, freezing water expands which adds pressure to the plumbing pipes. This unyielding pressure may cause the pipes to crack, eventually leaking the water inside your home. Learning how to unfreeze frozen pipes safely and efficiently can save you from trouble and untimely repairs due to water damage.

Preventing Your Pipes From Freezing

Before discussing how to unfreeze frozen pipes, we should also remember that prevention is still the best remedy. Before the winter season comes, make sure that you take the following initiatives to protect your pipes from getting frozen.
Insulate the pipes.
You can insulate the pipes with pipe wrap or pipe insulation. The wrap comes in rolls and can be spun around the pipe. Pipe insulation is a foam tube that can be put around pipes. Pipe insulation comes in different lengths and snaps over the pipe. Another product available is electric heat tape. Heat tape is a plug-in wire system that can be run along copper pipes to keep it from freezing. This can be added under pipe insulation and will only turn on when the temperature reaches a certain point.
Adjust the thermostat accordingly.
Always maintain your thermostat set at the same temperature from morning to evening. This can also reduce the tension in the furnace during extreme cold weather. If you plan to leave the house for a few days, you can lower your home’s thermostat but don’t set it below 59 Degrees Fahrenheit.
Allow a faucet to drip overnight or when you are away.
Allowing water to run a small but steady drip can prevent ice from forming inside those pipes when temperatures are freezing. Ice cannot form when water is moving.
Open cabinet doors.
If your kitchen and bathroom pipes are near the exterior walls, we recommend that you leave the cabinet doors open. This will allow warm air to circulate and may help prevent burst pipes.
Seal cold air leaks.
Cold air can enter your home through holes where electrical wiring, pipes, duct work, or dryer vents are installed. Seal those gaps and locate other areas where cold air can enter.

How To Unfreeze Frozen Pipes?

Despite the effort of protecting your pipes from getting frozen, it is still possible that you will end up with frozen pipes. So how can you unfreeze frozen pipes safely and efficiently? Here are some of the tips we can share. unfreeze frozen pipes with a thawing machine, hair dryer, and fan heater
Get a thawing machine.
If you live in places that often get freezing temperatures, it is a wise decision to invest in getting a thawing machine. This machine can help to get water flowing and reduce the risk of having pipes burst.
Use a hair dryer as a source of heat.
If you use a hair dryer to thaw a frozen pipe, do this with caution. This procedure works best on metal pipes. If your pipes are plastic, be careful since hair dryers can melt plastic pipes. PVC pipes can be damaged at temperatures as low as 140 °F (60 °C). Do not use other appliances stronger than a hair dryer.
Blow a fan heater into outdoor vents.
Blowing warm air into an external vent can quickly thaw any pipes that are nearby. Pipes often run alongside ductwork, so enforcing warm air into the ducts is a good idea.

When To Ask For Help From A Plumber?

Learning how to unfreeze frozen pipes during winter seasons can help you save time and money from untimely repairs. But expect the unexpected! If all efforts are in vain despite all the know-how to unfreeze frozen pipes, then it’s time for a professional plumber to handle the issue. Sometimes, it is easy to thaw frozen pipes by yourself. But if things are getting out of hand, it is better to contact Rochester New York’s best plumbers! Contact us anytime and we are here to take care of your frozen pipes concern.  
Read More

The Importance of Plumbing Inspection And When Is It Necessary

Plumbing Inspection Service by Leone Plumbing and HeatingMaintaining a home is important for the safety and comfort of your family. As a good maintenance practice, it is a good idea to have your home inspected once in a while to avoid any plumbing issues. It is also recommended for older homes which are vulnerable to deterioration. However, maintaining a home can be challenging, especially in those hard-to-reach and concealed areas such as your plumbing system. In this blog, we will get to know more about plumbing inspection and what it entails.

What Is A Plumbing Inspection?

A plumbing inspection is a full and in-depth look at your plumbing system. The purpose of conducting an inspection is always to prevent or detect plumbing issues that need to be fixed. When you hire a professional plumber, he will conduct a thorough inspection of your indoor and outdoor pipes. For hard-to-reach and concealed areas in your plumbing system, a professional plumber may use an inspection camera to inspect any damages that need to be fixed on the lines.

When Does a Plumbing Inspection Become Necessary?

A thorough plumbing inspection is necessary because of the following reasons.
To Protect Your Home From Deteriorating
Do not underestimate small leaks or clogs on your drain. Disregarding these plumbing issues may lead to extensive damage to your home. Regardless if it’s a small water leakage or a simple clog that you can fix by using a toilet plunger, you must take it seriously if it keeps recurring. This can be a sign that something terrible is going on in your home’s plumbing system.
To Avoid Untimely And Costly Plumbing Repairs
Regular plumbing inspections can prevent any small issues from escalating into a worse plumbing concern. As many say, “Prevention is better than cure”, it is also applicable when you are maintaining your home. Do not let simple plumbing issues become big. Otherwise, the untimely repair is much more costly than a plumbing inspection. Plumbing Inspection done by Leone Plumbing
Before Buying A Home
Buying a home is quite an investment. You have to make sure that you catch potential plumbing issues early before sealing the deal! This is recommended if you are buying an old home since it is much more prone to damage.  
If You Are Selling Your Home
A plumbing inspection is also necessary when you sell your home. Showing documents of the inspection report to the potential buyer is a good selling point! It will prove to the buyers that the house you are selling is of good value.  

Trust Only A Professional To Inspect Your Plumbing System

You can ensure an accurate result and quality plumbing inspection through a licensed plumber. If you are looking for the best plumbing service in the Rochester, New York area, then contact us! Our team of professional licensed plumbers is here at your service!
Read More

Prevention and Removal of Limescales In The Plumbing System

Limescales Prevention and Removal Service By Leone Plumbing and Heating At some point, a home may encounter issues with limescale building up on a plumbing system. It happens over time which affects the performance of your plumbing system. Today, we will talk about the causes of limescale buildup and how we can treat and prevent it from accumulating on pipes.

What Causes Limescale to Buildup On Pipes?

Most homes that are affected by mineral or limescale build-up are those that are located in areas that use hard water supply. Hard water is known to have a high concentration of dissolved calcium and magnesium. Over time, these minerals transform into a hard crust inside the pipes. These mineral deposits are not only building up inside the plumbing system but they can also accumulate inside your water-using appliances. If not treated, you may encounter plumbing issues such as:
  • Low Water Pressure
  • Clogged Pipes
  • Corroded Pipes

How Do We Prevent Limescale From Building Up On The Plumbing System?

Before we talk about the different solutions to remove the lime buildup, you should know the ways you can prevent it from accumulating.

Installing An Inline Filter

Installing an inline filter on the incoming water line is one way to prevent minerals from building up on pipes. These filters remove minerals and other substances from the water preventing them from accumulating in the pipes.

Use Water Softeners

Using water softeners is a known effective way of preventing the build-up of lime in the plumbing system. Through a process called ion exchange, it works by exchanging minerals like calcium and magnesium for sodium or potassium. This process removes the amount of minerals (e.g. calcium and magnesium) in the water that may build up in the plumbing system.

Use Deionized or Distilled Water

Using deionized or distilled water won’t contribute to lime buildup since they are free of minerals.

Installing Stainless Steel Pipes

Installing or upgrading to stainless steel pipes is also recommended to avoid issues with lime buildup. Stainless steel pipes are known to be resistant to corrosion and rusting (which are often the result of limescale buildup).

Removing Limescale Buildup From The Plumbing System Leone Plumbing and Heating Tips on Limescales Removal

Home remedies such as pouring vinegar on the drain and leaving it overnight can help dissolve stubborn limescale. Vinegar is an effective dissolving agent due to its acidic properties. After leaving your drain with vinegar overnight, just flush it with hot water. Another home remedy you can use is baking soda. You can use baking soda as an abrasive agent to scrub minerals that are building up on pipe surfaces. Simply mix a cup of baking soda with two cups of warm water (consistency should be similar to a paste). You can also regularly pour hot water on pipes to flush the minerals before they accumulate and clog the pipes over time.

Having Problems Dealing With Stubborn Lime Buildup?

Minerals building up on your plumbing system can be a very difficult problem to deal with. If home remedies and preventive measures don’t resolve the issue, the best option is to contact a professional to provide a better solution! So contact us today to schedule an appointment. We are here to help!  
Read More