DIY Guide On How To Relight A Pilot Light On Your Water Heater
 Is your water heater producing lukewarm or cold water? Before you pick up the phone to call a professional, you might be able to fix the problem yourself. In this DIY guide, we’ll show you how to relight the pilot light on your water heater step by step. With just a few simple tools and a little know-how, you can potentially save yourself time and money. In this comprehensive guide, we’ll cover everything you need to know, from identifying whether your pilot light is out to safely relighting it.
Signs That Your Water Heater Pilot Light Needs Relighting
Before you figure out how to relight a pilot light on the water heater you need to observe the signs. Here are some common signs that your pilot light may be out and needs relighting:1. No hot water:
If you turn on the hot water tap and only get cold or lukewarm water, it’s likely that your pilot light is out. Without a working pilot light, the burner won’t ignite, resulting in no hot water.2. Pilot light won’t stay lit:
If you’ve noticed that your pilot light keeps going out, even after relighting it, there may be an underlying issue causing the flame to extinguish. This could be due to a faulty thermocouple or a problem with the gas supply.
3. Gas smell:
If you detect a strong odor of gas near your water heater, it’s crucial to act quickly. A gas leak can be hazardous, so turn off the gas supply and ventilate the area immediately. In this case, do not attempt to relight the pilot light yourself and call a professional right away.Important Note To Remember:
These signs indicate that you may need to relight your pilot light, but it’s essential to follow the proper safety precautions before attempting to do so.Safety First Before You Relight The Pilot Light On Your Water Heater
Before you begin the process of relighting your water heater pilot light, it’s crucial to take the following safety precautions:1. Turn off the gas supply:
Locate the gas shut-off valve near your water heater. Turn the valve to the “off” position to cut off the gas supply. This step is crucial to prevent any gas leaks or accidents while you work on relighting the pilot light.
2. Allow time for gas to dissipate:
After turning off the gas supply, it’s important to allow some time for any remaining gas to dissipate. Open windows or doors to ventilate the area and ensure there are no lingering gas fumes.
3. Read the manufacturer’s instructions:
Each water heater may have slightly different instructions for relighting the pilot light. Take the time to read the manufacturer’s instructions carefully to ensure you understand the process and any specific safety considerations.
Step-by-step Guide To Relighting A Water Heater Pilot Light
Now that you’ve taken the necessary safety precautions, let’s dive into the step-by-step process of relighting your water heater pilot light:
Step 1: Access the pilot light assembly
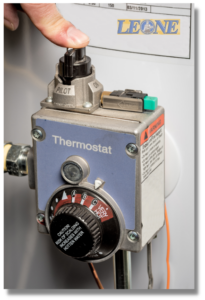
First, locate the access panel on your water heater. This panel is typically located near the bottom of the unit. Next, remove the panel by unscrewing or lifting it, depending on the type of water heater you have. Once the panel is removed, you should have clear access to the pilot light assembly.Step 2: Locate the pilot light and gas control knob
Look for the gas control knob on the front of the water heater. This knob is usually labeled and will have settings such as “on,” “off,” and “pilot.” Then set the gas control knob to the “off” position. This ensures that the gas supply to the pilot light is shut off.Step 3: Wait for the gas to dissipate
After turning the gas control knob to the “off” position, give the gas a few minutes to dissipate. This will help ensure there are no lingering gas fumes when you relight the pilot light.
Step 4: Locate the pilot light
Look for the pilot light assembly near the bottom of the water heater. It usually consists of a small tube with a metal tip. Next, locate the pilot light orifice, which is a small opening where the gas is released to ignite the flame.Step 5: Light the pilot light
With a long-reach lighter or fireplace match in hand, carefully bring the flame close to the pilot light orifice. While holding the flame near the orifice, turn the gas control knob to the “pilot” position. Press the knob down and hold it in this position to allow gas to flow to the pilot light. Continue to hold the knob down while you ignite the gas by bringing the flame closer to the orifice. Once the pilot light is lit, continue holding the knob down for about 20-30 seconds to ensure the flame stays lit. After 20-30 seconds, release the knob and the pilot light should remain lit.