 Are you planning to replace or install a new water heater in your home? It may seem daunting, but you can ensure a successful installation with the right knowledge and preparation. In this blog article, we will walk you through the essential tips that will help you achieve a seamless installation process.
Importance of Proper Water Heater Installation
Having a properly installed water heater is crucial for the safety, efficiency, and longevity of your home’s hot water system. Improper installation can lead to a range of issues, from water leaks and damage to your home to potential fire hazards and even carbon monoxide poisoning. When a water heater is not installed correctly, it may not function as intended, resulting in higher energy bills, inconsistent water temperatures, and a shorter lifespan for the appliance.
Proper water heater installation ensures that the unit is securely mounted, properly vented, and connected to the correct power or fuel source. It also involves ensuring that the water and gas lines are properly sized, sealed, and connected to the appliance. Additionally, a professional installation helps to guarantee that the water heater meets all local building codes and safety regulations, protecting both your home and your family.
Investing in a professional water heater installation can save you a significant amount of time, money, and hassle in the long run. By hiring a licensed and experienced plumber, you can be confident that your new water heater will be installed correctly, operate efficiently, and provide you with reliable hot water for years to come. Taking the time to ensure a proper installation can also help to prevent costly repairs or replacements down the line, making it a wise investment in the overall health and safety of your home’s plumbing system.
Types of Water Heaters
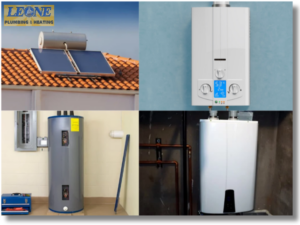
When it comes to choosing a new water heater, there are several different types to consider, each with its unique features and benefits. Consulting with a professional plumber can help you determine the most suitable water heater type and size for your home, ensuring a successful and efficient installation. The most common types of water heaters include:
Storage Tank Water Heaters
These are the traditional type of water heater, featuring a large tank that stores and heats a reserve of water. They are available in a range of sizes and can be powered by electricity, natural gas, or propane.Tankless Water Heaters
Also known as on-demand water heaters, these compact units heat water only when it is needed, rather than continuously maintaining a stored supply. Tankless water heaters can provide a continuous flow of hot water and are often more energy-efficient than traditional tank models.Heat Pump Water Heaters
These innovative units use electricity to transfer heat from the surrounding air into the water, making them highly energy-efficient. Heat pump water heaters offer significant energy savings and reduce greenhouse gas emissions, making them an environmentally friendly option for residential and commercial water heating.Solar Water Heaters
Harnessing the power of the sun, solar water heaters use solar panels to heat the water, reducing the reliance on traditional fuel sources. They are an environmentally friendly and cost-effective option, although the initial installation cost may be higher.Hybrid Water Heaters
These models combine the features of both storage tanks and tankless water heaters, offering the best of both worlds. Hybrid water heaters can provide the continuous hot water flow of a tankless unit while also maintaining a stored supply, making them a versatile choice for many homeowners.Choosing the Right Water Heater for Your Needs
Selecting the right water heater for your home is a crucial step in the installation process. The size and type of water heater you choose will depend on several factors, including the size of your home, the number of people living there, and your hot water usage patterns.
One of the most important considerations is the size of the water heater. A unit that is too small may not be able to keep up with your household’s hot water demands, leading to lukewarm showers and long wait times. Conversely, a water heater that is too large will be less efficient and may result in higher energy bills. To determine the appropriate size, you’ll need to calculate your home’s hot water usage, taking into account factors such as the number of bathrooms, the size of your family, and the number of appliances that use hot water.
In addition to size, you’ll also need to consider the type of water heater that best suits your needs. As mentioned earlier, the most common types are storage tanks, tankless, heat pumps, solar, and hybrid models. Each type has its advantages and disadvantages, so it’s important to weigh the pros and cons carefully.
When choosing a water heater, it’s also important to consider the fuel source. Electric, natural gas, and propane-powered water heaters all have their own unique features and installation requirements. Consulting with a professional plumber can help you determine the best fuel source for your home, taking into account factors such as availability, cost, and efficiency.
Ultimately, the right water heater for your home will depend on your specific needs and preferences. By carefully considering the size, type, and fuel source of the water heater, you can ensure that you make an informed decision and enjoy a successful installation process.
Preparation and Step-by-Step Guide to Water Heater Installation
Before you begin the process of installing a new water heater, it’s important to take the time to properly prepare for the task. This involves gathering all the necessary tools and materials, as well as ensuring that the installation site is ready and accessible. Here are the preparations and steps that you need to do.Preparation
1. Gather Tools and Materials:
- New water heater
- Pipe wrench
- Adjustable wrench
- Screwdrivers (flathead and Phillips)
- Teflon tape
- Pipe fittings and adapters
- Pipe cutter
- Soldering kit or pipe thread sealant (if needed)
- A bucket or hose for draining the old water heater
- Water heater pan (if required)
- Expansion tank (if required)
- Safety equipment (gloves, goggles)
2. Turn Off Utilities:
- Shut off the water supply to the house.
- Turn off the power supply to the water heater (electric) or turn off the gas supply (gas).
3. Drain the Old Water Heater:
- Attach a hose to the drain valve of the old water heater.
- Open the valve and allow the water to drain into a bucket or outside.
4. Disconnect Old Water Heater:
- Disconnect the water supply lines.
- For electric heaters, disconnect the electrical wires.
- For gas heaters, disconnect the gas line.
Step-by-Step Guide to Installation
1. Position the New Water Heater:
- Place the new water heater in its designated location, ensuring it is level.
- Use a water heater pan underneath if required by code or recommended.
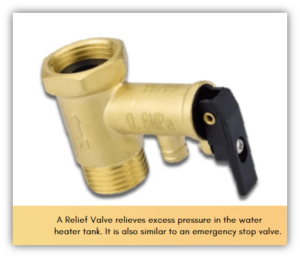
2. Install the Pressure Relief Valve:
- Attach the pressure relief valve to the designated fitting on the new heater.
- Run a discharge pipe from the valve to within a few inches of the floor or to a drain.
3. Connect the Water Supply Lines:
- Use Teflon tape or pipe thread sealant on the threaded connections.
- Connect the cold water supply line to the inlet and the hot water line to the outlet.
4. Install the Expansion Tank (if required):
- Install the expansion tank according to the manufacturer’s instructions.
- Connect it to the cold water supply line.
5. Reconnect Power or Gas Supply:
- For electric heaters, connect the electrical wires to the terminals on the heater.
- For gas heaters, connect the gas line and check for leaks using a soap solution.
6. Fill the Tank with Water:
- Open the cold water supply valve.
- Open a hot water faucet in the house to allow air to escape and fill the tank until water flows steadily from the faucet.
7. Check for Leaks:
- Inspect all connections for leaks and tighten them as necessary.
8. Turn on the Heater:
- For electric heaters, turn on the power at the circuit breaker.
- For gas heaters, relight the pilot light or follow the manufacturer’s instructions for starting the heater.
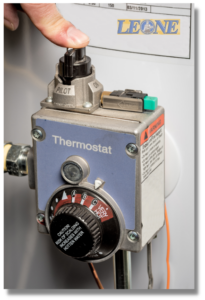
9. Adjust Temperature Setting:
- Set the thermostat to the desired temperature, typically around 120°F (49°C).
10. Inspect and Test:
- Monitor the water heater for a few hours to ensure proper operation.
- Check for any signs of leaks or issues.
Common Mistakes To Avoid During Installation
While a water heater installation may seem straightforward, there are several common mistakes that homeowners often make that can lead to problems down the line. By being aware of these potential pitfalls, you can take steps to avoid them and ensure a successful installation.
Failing to properly size the water heater for the household’s needs.
As mentioned earlier, it’s crucial to calculate the household’s hot water usage and select a water heater that is the appropriate size. Installing a unit that is too small will result in insufficient hot water, while a unit that is too large will be less efficient and cost more to operate.
Improper venting or ventilation of the water heater.
Proper venting is essential for the safe and efficient operation of the unit, as it allows for the proper removal of exhaust gases. Failing to properly vent the water heater can lead to dangerous carbon monoxide buildup, as well as reduced efficiency and potential fire hazards.
Incorrect plumbing connections.
This is another common issue that can arise during water heater installations. If the water supply lines, hot water lines, and pressure relief valves are not properly connected, it can result in leaks, water damage, and other problems. It’s important to ensure that all plumbing connections are secure and sealed with the appropriate fittings and sealants.
Neglecting to follow local building codes and safety regulations.
This mistake can have serious consequences! Each state may have specific requirements for water heater installations, such as the placement of the unit, the type of venting required, and the necessary permits. Failing to comply with these regulations can result in fines, safety issues, and even legal problems.
Installing a water heater without the proper tools and knowledge.
Water heater installations can be complex, and attempting to do it yourself without the necessary skills and equipment can lead to a range of problems, from improper connections to safety hazards. It’s generally recommended to hire a licensed and experienced plumber to handle the installation process.
By being aware of these common mistakes and taking steps to avoid them, you can ensure a successful and safe water heater installation that will provide reliable hot water for your home for years to come.
Enjoy The Benefits Of A Successful Water Heater Installation!
Congratulations! If you’ve followed the steps outlined in this guide, you’ve successfully installed a new water heater in your home. This is an important accomplishment that will provide you and your family with reliable, consistent hot water for years to come.
A properly installed water heater not only ensures the safety and efficiency of your home’s plumbing system, but it can also save you money on your energy bills. By choosing the right size and type of water heater for your household’s needs, and ensuring that it is installed correctly, you can maximize the unit’s energy efficiency and reduce your overall energy consumption.
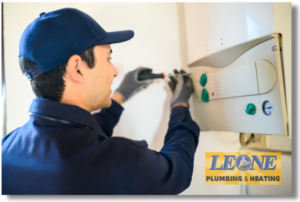
 However, if you have any doubts or lack the necessary knowledge and tools for installing a water heater, it’s best to hire a professional plumber. Water heater installation involves handling electricity, gas, and plumbing connections, all of which can be dangerous if not done correctly. A professional plumber has the expertise to ensure the installation is done safely and efficiently, preventing potential hazards such as leaks, electrical issues, or gas leaks. Trusting a qualified plumber will give you peace of mind and ensure your water heater operates correctly and safely. So contact us right away if you need help with your water heater installation.
 Is your water heater producing lukewarm or cold water? Before you pick up the phone to call a professional, you might be able to fix the problem yourself. In this DIY guide, we’ll show you how to relight the pilot light on your water heater step by step. With just a few simple tools and a little know-how, you can potentially save yourself time and money. In this comprehensive guide, we’ll cover everything you need to know, from identifying whether your pilot light is out to safely relighting it.
 The water heater is an essential appliance that we use almost every day in the kitchen, shower, and laundry. We need it most especially during the winter to keep us warm. But what would you do if your water heater is no longer heating up or if it is leaking? Would you go with water heater repair or replace the whole unit? What are the things you need to know before deciding?
 Looking out for the following red flags can help you determine if your water heater needs repair. If you are experiencing these signs, it is best to contact a professional plumber.
 Water heater maintenance should be done regularly to prolong the life of your water heater. One way that you can maintain your water heater is through
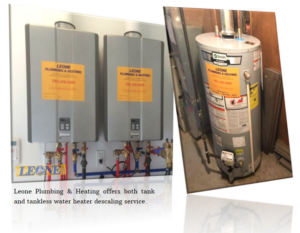
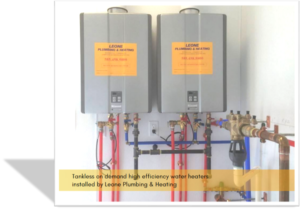 A tankless water heater is the best choice when it comes to energy efficiency. If you compare it with tank-style water heaters, it will only spend energy when a hot water tap is turned on or if there is an appliance being used. Since it doesn’t come with a tank, most homeowners believe that a tankless water heater doesn’t leak. However, a tankless water heater can still be susceptible to leaks. Proper care and maintenance still play an important role in the longevity of this appliance.