Staying Calm In Dealing With Plumbing Emergencies

Staying Calm In Dealing With Plumbing EmergenciesDealing with a plumbing emergency can be a frantic and overwhelming experience. Burst pipes, overflowing toilets, or clogged drains can quickly turn your home into a chaotic mess. However, staying calm and taking immediate action is crucial to prevent further damage. Today, we will provide tips to help you confidently navigate plumbing emergencies. With a focus on staying calm and fixing the chaos, we will guide you through step-by-step solutions to common plumbing issues, ensuring that you have the knowledge to handle these situations effectively.

What Are The Common Plumbing Emergencies?

Plumbing emergencies can occur at any time, catching us off guard and causing significant disruption. Being aware of the most common plumbing emergencies can help you prepare and respond effectively. Here are a few scenarios you may encounter:

Burst Pipes

Burst pipes can result from freezing temperatures, aging pipes, or excessive water pressure. They can cause extensive water damage if not addressed promptly.

Overflowing Toilets

A clogged toilet can quickly lead to an overflow, creating a messy and unsanitary situation. This can happen due to excessive toilet paper usage, foreign objects, or a plumbing blockage.

Clogged Drains

Whether it’s a kitchen sink, bathroom sink, or shower drain, blockages can occur due to the accumulation of debris, hair, soap scum, or grease. Clogged drains can cause water backup and unpleasant odors.

Leaking Faucets or Showerheads

A leaking faucet or showerhead not only wastes water but can also indicate underlying plumbing issues. Ignoring a small leak can lead to more significant problems down the line.

Water Heater Malfunction

A malfunctioning water heater can result in cold showers or no hot water at all. This can be especially inconvenient during the colder months.

The Importance Of Staying Calm During A Plumbing Emergency

When faced with a plumbing emergency, it’s natural to feel panicked and overwhelmed. However, staying calm is essential to assess the situation accurately and take appropriate action. Here’s why staying calm is crucial:

Clear Thinking

Panicking can cloud your judgment and hinder your ability to make rational decisions. By staying calm, you can think clearly and take the necessary steps to resolve the emergency.

Preventing Further Damage

Acting hastily or without a clear plan can lead to additional damage. By remaining calm, you can minimize the risk of exacerbating the situation and causing more harm.

Effective Communication 

During a plumbing emergency, it’s essential to communicate clearly with any professionals you may need to call for assistance. Staying calm allows you to convey the details accurately and ensure that help arrives promptly.

Essential Tools For Handling Plumbing Emergencies

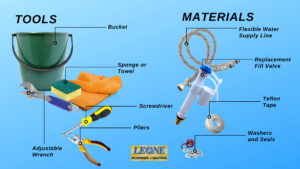
Tools Must Have For Handling Plumbing EmergenciesNow that you know the importance of staying calm during a plumbing emergency, let us explore the essential tools that you need. Having the right tools readily available can make all the difference in efficiently resolving a plumbing emergency. Here are some essential tools you should have in your toolkit:

Adjustable Wrench

An adjustable wrench is a versatile tool that can be used to tighten or loosen various plumbing fittings. It’s essential for tasks like fixing leaks or replacing faucets.

Plunger 

A plunger is a must-have tool for dealing with clogged toilets and drains. It creates suction and helps dislodge blockages, allowing water to flow freely again.

Pipe Wrench

A pipe wrench is specifically designed to grip and turn pipes, making it useful for tasks like tightening or removing pipe fittings. It’s a sturdy tool that can handle heavy-duty plumbing work.

Plumber’s Tape 

Also known as Teflon tape, plumber’s tape is used to seal pipe threads and prevent leaks. It’s an inexpensive yet effective tool for ensuring watertight connections.

Buckets And Towels

Having a bucket and towels on hand can help contain water leaks and minimize damage. They are especially useful when dealing with burst pipes or overflowing toilets.

Shutting Off The Main Water Supply

During plumbing emergencies shut off the main water supply first

In the event of a plumbing emergency, the first step is to shut off the main water supply to your home. This will help prevent further water damage while you address the specific issue. It is a crucial step that should be taken as soon as possible in a plumbing emergency. Here’s how to do it:

1. Locate the Main Water Shut-Off Valve:

The main water shut-off valve is usually located near the water meter or where the main water line enters your home. It’s essential to know its location beforehand.

2. Turn Off the Water:

Once you locate the main shut-off valve, turn it clockwise (right) to shut off the water supply. This will stop water from flowing into your home and prevent any additional damage.

3. Open Faucets to Drain Remaining Water:

After shutting off the main water supply, open faucets throughout your home to drain any remaining water in the pipes. This will help reduce pressure and minimize potential leaks.

Basic DIY Skills To Help You Before A Professional Plumber Arrives

Dealing with plumbing emergencies can be stressful, but having some basic do-it-yourself (DIY) skills can help you mitigate the situation until a professional plumber arrives. Here are some tips:

1. Shut Off the Water Supply

In any plumbing emergency involving leaks or bursts, the first step is to shut off the main water supply to your home. Locate the main shut-off valve and turn it clockwise to stop the flow of water.

2. Know Your Plumbing:

Familiarize yourself with your home’s plumbing system, including the location of shut-off valves for individual fixtures like sinks and toilets.

3. Keep A Plumbing Kit:

Have a basic plumbing kit on hand that includes items like a plunger, adjustable wrench, pipe wrench, plumbing tape, and a pipe cutter. These tools can help you address minor issues and make temporary repairs.

4. Fix Leaks:

For minor leaks, you can use a plumber’s tape or a pipe clamp to temporarily stop the flow of water. Wrap the plumber’s tape around the leaking joint tightly, or use a pipe clamp to secure the leak until a professional plumber can repair it permanently.

5. Clear Clogged Drains:

Use a plunger or a plumbing snake to clear clogged drains. For minor clogs, a plunger may be sufficient, but for more stubborn blockages, a plumbing snake can help dislodge debris.

6. Deal With Frozen Pipes:

If you discover frozen pipes, turn off the water supply to prevent further damage. Thaw the pipes using a hairdryer or heating pad, starting from the end nearest to the faucet.

7. Address Overflowing Toilets:

If your toilet is overflowing, turn off the water supply to the toilet by shutting the valve behind the toilet. Use a plunger to try and dislodge the blockage. If the water level doesn’t recede, remove the tank lid and lift the flapper to stop the flow of water into the bowl.

8. Use A Wet/Dry Vacuum:

In cases where there’s standing water, a wet/dry vacuum can help remove excess water before it causes damage to your home.

9. Safety First:

Always prioritize safety when dealing with plumbing emergencies. If you’re unsure about how to handle a situation, it’s best to wait for a professional plumber rather than risk causing further damage or injury.

When Do I Call A Professional Plumber?

While DIY fixes can be helpful in the short term, some plumbing issues require the expertise of a licensed plumber. If you’re unable to resolve the problem on your own or if the situation seems beyond your capabilities, don’t hesitate to call for professional help. Remember, safety should always be your top priority when dealing with plumbing emergencies. If you are looking for a trusted professional plumber in the Rochester New York area, contact us, and we are ready to respond to your plumbing emergency needs!
Read More

A Guide to Effective Residential Drain Cleaning

Leone Plumbing residential drain cleaning services in Rochester, New York Having a clean and functional drainage system is essential for a smooth-running household. However, over time, debris, grease, hair, and other materials can accumulate in your pipes, leading to clogs and potential damage. That is why regular residential drain cleaning is essential for a clean and well-maintained drainage system. If you are tired of dealing with stubborn clogs and plumbing issues in your residential drains, this article is for you! Don’t let clogged drains disrupt your daily routine. Follow our guide and experience the relief of a clog-free living space.

The Importance of Regular Residential Drain Cleaning

A clean and well-maintained drainage system is crucial for the overall functionality of your home. Regular drain cleaning not only prevents clogs and plumbing issues but also ensures the longevity of your pipes. Neglecting drain cleaning can lead to costly repairs and even potential health hazards.

One of the main benefits of regular residential drain cleaning is the prevention of clogs. Over time, debris such as food particles, soap scum, and hair can accumulate in your pipes, causing blockages. These clogs can lead to slow drains, unpleasant odors, and even water backups. By cleaning your drains regularly, you can remove these build-ups and prevent clogs from occurring.

How To Detect A Clogged Drain?

Rochester New York residential drain cleaning services by Leone PlumbingIdentifying a clogged drain early on is crucial for preventing further damage and resolving the issue promptly. If you notice any of these signs, it’s important to address the issue promptly to prevent further damage.

1. Slow draining:

If water takes longer than usual to drain from your sink, shower, or bathtub, it may be a sign of a clogged drain. Slow draining is often caused by a build-up of debris that restricts the flow of water.

2. Gurgling sounds:

If you hear gurgling sounds coming from your drains when you flush the toilet or run water, it could indicate a clog. These sounds occur when air gets trapped in the pipes due to a blockage.

3. Foul odors:

Unpleasant odors emanating from your drains are a clear sign of a clogged drain. When debris accumulates in your pipes, it can start to decompose, resulting in foul smells.

4. Water backups:

If water starts to back up in your sink, shower, or toilet, it is a definite indication of a clogged drain. Water backups occur when a clog prevents water from flowing freely through the pipes.

5. Multiple clogged fixtures:

When several fixtures in your home, such as sinks and toilets, experience drainage issues simultaneously, it suggests a clog in the main sewer line. This requires immediate attention from a professional plumber.

DIY Drain Cleaning Methods

When faced with a clogged drain, there are several DIY methods you can try before calling in a professional plumber. These methods are cost-effective, easy to implement, and can often resolve minor clogs. Here are some effective DIY residential drain cleaning methods:

1. Boiling water:

Boiling water is one of the simplest and most effective methods for clearing minor clogs. Carefully pour a pot of boiling water down the drain to dissolve grease and other debris. This method works well for clogs caused by soap scum or grease build-up.

2. Baking soda and vinegar:

This classic DIY drain cleaning method can help break down clogs and eliminate odors. Start by pouring half a cup of baking soda down the drain, followed by half a cup of vinegar. Cover the drain and let the mixture sit for about 30 minutes. Finally, flush the drain with hot water to clear the clog.

3. Plunger:

A plunger is a versatile tool that can be used to unclog various fixtures, such as sinks, toilets, and showers. Make sure there is enough water in the fixture to cover the suction cup of the plunger. Place the plunger over the drain and vigorously plunge up and down. Repeat this process several times until the clog is dislodged and the water drains freely.

4. Wire hanger:

If you can’t reach the clog with a plunger, a wire hanger can be a handy tool to retrieve it. Straighten the hanger and create a small hook at one end. Insert the hooked end into the drain and try to fish out the clog. Be gentle to avoid scratching or damaging the pipes.

5. Salt and baking soda:

This DIY solution is particularly effective for clearing clogs caused by grease and food particles. Mix equal parts salt and baking soda and pour the mixture down the drain. Let it sit for a few hours or overnight, then flush the drain with hot water. The salt and baking soda combination helps break down grease and eliminate odors.

Remember, these DIY methods are suitable for minor clogs. If you’re dealing with persistent or severe blockages, it’s best to seek professional help.

You Can Avoid Clogged Drains From Occurring!

Prevention is key when it comes to maintaining clean and functional drains. By adopting a few simple habits and implementing preventive measures, you can minimize the chances of experiencing drain clogs.

Using Drain Covers or Strainers

One of the easiest ways to prevent drain clogs is by using drain covers or strainers. These inexpensive accessories can catch hair, food particles, and other debris before they enter your drains. Regularly cleaning the covers or strainers will ensure they continue to function effectively.

Be Mindful Of What You Put Down Your Drains

Another preventive measure is to be mindful of what you put down your drains. Avoid pouring grease, oil, coffee grounds, and other substances that can solidify and cause clogs. Instead, dispose of these items in the trash or recycle them appropriately. Additionally, ensure that your family members are aware of what should and shouldn’t be flushed down the toilet.

Regularly Flush Drains With Hot Water

Regularly pouring boiling water down your drains can also help prevent clogs. Boiling water can dissolve grease and other sticky substances that may be clinging to the inside of your pipes. This simple technique, when done once a week, can go a long way in keeping your drains clear and free-flowing.

By following these preventive measures, you can significantly reduce the risk of clogged drains and maintain a healthy plumbing system.

The Role of Professional Drain Cleaning Services

Leone Plumbing in Rochester New York residential drain cleaning services

While DIY methods and preventive measures can be effective for minor clogs, sometimes the expertise of a professional drain cleaning service is necessary. Professional plumbers have the knowledge, experience, and specialized tools to tackle even the most stubborn clogs and ensure a thorough cleaning of your drains.

Professional drain cleaning services offer several advantages over DIY methods. Firstly, they have access to high-pressure water jetting equipment, which can effectively clear even the toughest clogs and remove debris from your pipes. This method is particularly useful for removing tree roots or mineral build-up.

Secondly, professional drain cleaners use video inspection technology to identify the exact location and cause of a clog. This allows them to provide targeted solutions and prevent future issues. Video inspections also help detect any underlying problems within your plumbing system, such as damaged pipes or misaligned connections.

Lastly, professional drain cleaning services offer a safe and hassle-free solution to persistent clogs. They have the necessary protective gear and know-how to handle potentially hazardous substances, such as chemical drain cleaners or sewage backups. Hiring a professional ensures that the job is done safely and effectively, giving you peace of mind.

Contact Us For Your Residential Drain Cleaning

When you choose us for residential drain cleaning services, you’re not just hiring a company – you’re partnering with a team of dedicated and experienced professionals. From minor clogs to complex blockages, we possess the knowledge and skills necessary to tackle any challenge with precision and efficiency. Don’t let drain problems disrupt your peace of mind any longer. Book us today and experience the difference firsthand.  
Read More

Saving Your Home from Corroded Pipes

Leone Plumbing corroded pipes repair serviceAre you aware that corroded pipes could be silently damaging your home? If left unchecked, corroded pipes can lead to costly repairs, cause water leaks, and even create potential health hazards. That’s why early detection and proper maintenance of your plumbing system are crucial. In this article, we will share expert tips on how you can save your home from the perils of corroded pipes.

The Importance Of Early Detection And Proper Maintenance For Home Pipes

Maintaining the integrity of your home’s plumbing system is essential to protect your investment and ensure the comfort and safety of your family. Corroded pipes can wreak havoc on your property, leading to a host of issues that can be both financially and emotionally draining. By taking proactive measures and staying vigilant, you can save your home from the damaging effects of corroded pipes. Corrosion occurs when metal pipes interact with various factors such as water, chemicals, and even the soil surrounding them. Over time, this interaction leads to a breakdown of the pipe’s structure, causing leaks, reduced water pressure, and potential health risks due to contaminated water. Early detection is key to minimizing the extent of damage and preventing further complications.

Proper maintenance is equally important in ensuring the longevity of your plumbing system. Regular inspections, routine maintenance, and prompt repairs are essential to prevent corrosion from taking hold and causing significant damage. By investing time and effort in early detection and proper maintenance, you can save yourself from the headaches and financial burden associated with corroded pipes.

Common Causes Of Pipe Corrosion

Understanding the root causes of pipe corrosion is essential in preventing and managing this destructive issue. Various factors contribute to the corrosion of pipes, including:

Age of Your Home
Older homes often have plumbing systems that are more susceptible to corrosion due to the materials used at the time of construction. Galvanized steel pipes, commonly found in older properties, tend to corrode more rapidly than newer materials such as copper or PEX.
Water Quality
The quality of the water flowing through your pipes can significantly impact their lifespan. High levels of acidity, alkalinity, or mineral content can accelerate the corrosion process. Additionally, water with high chloride or sulfate levels can be particularly corrosive to certain metals.
Chemicals and Environmental Factors

Exposure to harsh chemicals, such as cleaning agents or fertilizers, can corrode pipes over time. Environmental factors, such as high humidity or soil acidity, can also contribute to accelerated corrosion rates.

Signs of Corroded Pipes

Now that you’re aware of the causes, let’s explore the telltale signs that indicate your pipes may be corroded. Early detection of corroded pipes is crucial in preventing further damage and costly repairs. By being aware of the following signs, you can proactively address any issues before they escalate:

Discolored Water

If you notice a change in the color of your tap water, such as brown or yellowish tones, it could be an indication of corroded pipes. The presence of rust or other contaminants in the water is a clear sign that your pipes are deteriorating.

Low Water Pressure

Reduced water pressure can be a result of corroded pipes. As the pipes degrade, they become narrower, restricting the flow of water. If you’re experiencing consistently low water pressure throughout your home, it’s worth investigating the condition of your pipes.

Frequent Leaks

Corroded pipes are more prone to developing leaks. If you notice recurring leaks in your plumbing system, it’s a strong indication that the pipes are deteriorating and in need of attention. Ignoring these leaks can lead to extensive water damage and mold growth.

Preventive Maintenance Tips For Pipe Longevity

Proactive maintenance is key to preventing pipe corrosion and extending the lifespan of your plumbing system. Here are essential tips for maintaining healthy pipes:

  1. Regular Cleaning: Flush your pipes periodically by running hot water through them to remove any built-up sediment or debris. This simple maintenance practice helps prevent corrosion-causing particles from accumulating and damaging your pipes.
  2. Water Softening: If your water supply has a high mineral content, consider installing a water softener. Water softeners remove excess minerals that can contribute to pipe corrosion, thereby protecting your plumbing system.
  3. Avoid Harsh Chemicals: Be mindful of the cleaning agents and chemicals you use in your home. Harsh chemicals can corrode pipes over time. Opt for environmentally friendly alternatives and avoid pouring corrosive substances down drains or toilets.

Implementing these preventative measures can significantly reduce the risk of pipe corrosion. However, in cases where corrosion has already taken hold, repair or replacement may be necessary.

Replacing Corroded Pipes

In severe cases of corrosion, pipe replacement may be the most suitable solution. This involves removing the corroded pipes and installing new ones made from materials resistant to corrosion. When it comes to pipe replacement, selecting the right materials is crucial for long-term durability and corrosion resistance. Here are two widely used options:

  1. Copper Pipes: Copper pipes have long been a popular choice due to their excellent corrosion resistance and durability. They are suitable for both hot and cold water supply lines and have a proven track record of reliability.
  2. PEX Pipes:  Cross-linked polyethylene (PEX) pipes are gaining popularity for their flexibility, ease of installation, and resistance to corrosion. PEX pipes are highly durable and suitable for both residential and commercial applications.

Hiring A Professional Plumber For Pipe Maintenance And Repairs

While DIY methods and proactive maintenance play a crucial role in preventing pipe corrosion, there are situations where professional expertise is necessary. Hiring a professional plumber offers several benefits:

  1. Expert Knowledge: Professional plumbers possess specialized knowledge and experience in identifying, addressing, and preventing pipe corrosion. Their expertise ensures accurate assessments and effective solutions for your plumbing system.
  2. Time and Cost Savings: Engaging a professional plumber saves you time and money in the long run. Their efficient repairs and proactive maintenance help prevent extensive damage and costly repairs down the line.
  3. Peace of Mind: By entrusting your plumbing system to a professional, you can have peace of mind knowing that your pipes are in capable hands. Professional plumbers adhere to industry standards and deliver quality workmanship.
How Leone plumbing deal with corroded pipes issue As Rochester, New York’s best plumbers, it is our goal to help you protect your home and your business from the perils of corroded pipes. We provide the right solution for your plumbing pipe maintenance and repair concerns. Don’t wait for problems to arise – start protecting your home today! Contact us and schedule an appointment.  
Read More

How to Properly Install PEX Pipe For A Leak-Free Home

Installing PEX pipe professionally done by Leone Plumbing

Installing the right plumbing system is essential for a leak-free and hassle-free home. And when it comes to choosing the best piping material, PEX (cross-linked polyethylene) pipes are gaining popularity for all the right reasons. With their excellent flexibility, durability, and resistance to freezing, PEX pipes have become a preferred choice for homeowners and contractors alike. But proper installation is key to ensuring their leak-free performance. In this comprehensive guide, we will walk you through the step-by-step process of installing PEX pipes, from preparing the materials to connecting the fittings. We will also discuss the importance of using the right tools and techniques to achieve secure and reliable connections.

Advantages Of Using PEX Pipe For Plumbing

Another advantage of PEX pipe is its durability. Unlike copper, PEX pipe does not corrode or develop pinhole leaks over time. It is also resistant to scale build-up, ensuring consistent water flow and reducing the need for maintenance. PEX pipe is also quieter compared to metal pipes, as it absorbs water hammer and minimizes noise transmission. Moreover, PEX pipe is less expensive than copper, making it a cost-effective choice for plumbing projects.

Types Of PEX Pipe

Before you begin your PEX pipe installation, it is important to understand the different types and sizes of PEX pipe available. PEX pipe comes in three main types: PEX-A, PEX-B, and PEX-C. Each type has its unique characteristics and uses.

  • PEX-A is the most flexible type of PEX pipe and can withstand repeated bending without losing its shape. This makes it ideal for installations that require many bends and curves.
  • PEX-B is slightly less flexible than PEX-A but still offers excellent durability and reliability.
  • PEX-C is the least flexible type, but it is also the most affordable option.

PEX Pipe Sizes

In terms of sizes, PEX pipe is available in various diameters, commonly ranging from 3/8 inch to 1 inch. The size you choose will depend on the water flow requirements of your plumbing system. It is important to select the appropriate size to ensure proper water pressure and flow.

When purchasing PEX pipe, be sure to check for industry certifications, such as the NSF (National Sanitation Foundation) certification, to ensure that the pipe meets quality standards and is suitable for potable water applications.

Step-By-Step Guide To Installing PEX Pipe

Before you begin installing PEX pipes, there are a few important steps you need to take to ensure a smooth and efficient installation process. Here’s what you need to do:

1. Plan your plumbing system: Determine the layout of your plumbing system, including the location of fixtures, supply lines, and drains. This will help you calculate the amount of PEX pipe and fittings you will need for the project.

2. Shut off the water supply: Before you start any plumbing work, make sure to shut off the main water supply to your home. This will prevent any accidents or water damage during the installation process.

3. Remove old pipes if necessary: If you are replacing an existing plumbing system, you will need to remove the old pipes before installing the PEX pipe. Follow proper procedures for removing old pipes, such as draining the water and using appropriate tools.

4. Prepare the work area: Clear the work area of any obstacles and ensure you have enough space to maneuver and work comfortably. Lay down protective sheets or tarps to protect the flooring or surfaces from any potential damage.

By properly preparing for the PEX pipe installation, you can minimize any potential issues and ensure a successful and efficient installation process.

Tips For Avoiding Leaks During PEX Pipe Installation Tools for Installing PEX Pipe

Now that you have prepared for the PEX pipe installation, it’s time to dive into the step-by-step process. Follow these instructions to properly install PEX pipe for a leak-free plumbing system:

1. Measure and cut the PEX pipe: Measure the length of the pipe needed for each section of the plumbing system. Use a PEX cutting tool to make clean and straight cuts. Be sure to deburr the cut ends to remove any rough edges.

2. Insert the fittings: Slide a PEX sleeve onto the end of the PEX pipe. Insert the PEX fitting into the end of the pipe until it reaches the shoulder of the fitting. Ensure that the fitting is fully inserted and seated properly.

3. Crimp the connection: Use a PEX crimping tool to crimp the PEX ring around the fitting. Position the crimping tool over the crimp ring and squeeze the handles firmly until the tool is released. Repeat the crimping process on the other end of the fitting to create a secure connection.

4. Secure the PEX pipe: Use pipe hangers to secure the PEX pipe to the framing or other structural elements. Make sure to leave enough room for the pipe to expand and contract with temperature changes.

5. Connect the PEX pipe to fixtures and appliances: Use PEX fittings to connect the PEX pipe to fixtures, such as faucets and toilets, as well as appliances, such as water heaters and washing machines. Follow the manufacturer’s instructions for each specific connection.

6. Install the PEX manifold: If you are using a PEX manifold, install it in a central location and connect the PEX pipes to the manifold using appropriate fittings. The manifold will allow you to control the flow of water to different areas of the plumbing system.

7. Insulate the PEX pipes: Wrap pipe insulation around the PEX pipes to prevent freezing and reduce heat loss. Pay special attention to pipes located in unheated areas or near exterior walls.

By following these step-by-step instructions, you can ensure a proper and secure installation of PEX pipe for a leak-free plumbing system.

Maintaining And Troubleshooting PEX Pipe Systems

Once you have completed the installation of the PEX pipe, it is important to test and inspect the connections to ensure their integrity. Follow these steps to test and inspect the PEX pipe connections:

1. Close all fixtures and appliances: Make sure all faucets, toilets, and other fixtures are turned off. This will isolate the PEX pipe system and allow you to test the connections effectively.

2. Pressurize the system: Use a pressure gauge and a suitable pump to pressurize the PEX pipe system. Follow the manufacturer’s instructions for the specific pressure requirements of your system.

3. Inspect for leaks: Once the system is pressurized, visually inspect all the connections for any signs of leaks. Check the fittings, crimps, and sleeves for any water seepage or drips. If you notice any leaks, mark the location for repair.

4. Repair any leaks: If you find any leaks during the inspection, you will need to repair them immediately. Cut out the faulty section of the PEX pipe and replace it with a new one. Follow the proper procedures for cutting and connecting the new pipe.

5. Re-test the system: After repairing any leaks, re-pressurize the system and re-inspect all the connections. Make sure there are no new leaks and that all the connections are secure and leak-free.

By testing and inspecting the PEX pipe connections, you can identify and address any leaks before they cause significant damage to your plumbing system or property.

Installing PEX Pipe With A Professional

In the event of any problems or issues with installing your PEX pipe system, it is recommended to consult a professional plumber or the manufacturer for troubleshooting and repair guidance. As a team of experienced professional plumbers in the Rochester New York area, we are committed to providing you with quality PEX pipe installation. For your PEX pipe installation needs, contact us, and we are here to help!

Read More

The Advantages and Process of Drain Camera Inspection Services

Leone Plumbing drain camera inspection services in Rochester New YorkWhen it comes to plumbing issues, finding the root cause can often be a challenge. That’s where drain camera inspection services come in. By peering into the depths of your pipes with the help of advanced camera technology, these services offer a clear view of what’s happening underground. Using state-of-the-art equipment, drain camera inspections provide homeowners and businesses with a thorough assessment of their plumbing systems. This advanced approach allows for quicker identification of clogs, leaks, and other potential problems, saving time and money in the long run. By combining cutting-edge technology with expert analysis, these services empower individuals to make informed decisions about their plumbing systems, leading to more efficient and cost-effective solutions.

The Advantages Of Drain Camera Inspection Services

Drain camera inspection services offer several advantages over traditional plumbing diagnostic methods.

Provide Accurate And Precise Results

Firstly, they provide accurate and precise results. The high-resolution cameras used in drain camera inspections capture clear images and videos of the inside of pipes, allowing professionals to identify the exact location and nature of the problem. This eliminates the guesswork involved in traditional diagnostic approaches and ensures that the correct solution is implemented from the start.

Eliminate Invasive Procedures

Secondly, drain camera inspections eliminate the need for invasive procedures like digging or tearing down walls. In the past, diagnosing plumbing issues often required destructive methods, resulting in additional costs and inconvenience for homeowners. With drain camera inspection services, professionals can visually inspect the pipes without causing any damage to the property. This non-invasive approach not only saves time and money but also minimizes disruption to the daily lives of individuals.

Provide Thorough And Accurate Diagnostics

The detailed images and videos captured during drain camera inspections provide transparency and thorough documentation. Homeowners and businesses can view the real-time footage or saved recordings, allowing them to see the condition of their pipes firsthand. This transparency builds trust between the service provider and the customer and ensures that all parties involved have a clear understanding of the problem and its solution. Additionally, the documented evidence can be useful for insurance claims or future reference.

Common Issues Detected By Drain Camera Inspections

Drain camera inspections are capable of identifying a wide range of plumbing issues that may not be easily detectable through other means. Some of the most common issues detected by these inspections include:

1. Clogs:

Drain camera inspections can pinpoint the exact location and cause of clogs within the pipes. Whether it’s a buildup of grease, hair, or foreign objects, the camera provides a clear view of the obstruction, enabling professionals to determine the most appropriate method of removal.

2. Leaks:

Pipe leaks can be difficult to detect, especially if they are hidden behind walls or underground. Drain camera inspections allow for visual confirmation of leaks, helping professionals identify the extent of the damage and plan the necessary repairs.

3. Cracks and Damage:

Over time, pipes can develop cracks, fractures, or other forms of damage that may go unnoticed without a drain camera inspection. By examining the interior of the pipes, professionals can identify any structural issues and take appropriate action to prevent further damage or leaks.

4. Root Intrusions:

Tree roots tend to grow towards sources of water, including underground pipes. These root intrusions can cause blockages and damage to the pipes, leading to reduced water flow and potential leaks. Drain camera inspections can detect and locate these root intrusions, allowing for targeted root removal and pipe repair.

5. Misaligned or Collapsed Pipes:

Drain camera inspections can reveal any misaligned or collapsed sections of pipes. This information is crucial for determining the best course of action, whether it’s repairing the affected section or replacing the entire pipe.

The Importance Of Regular Drain Camera Inspection Services

Drain camera inspections involve a systematic process that utilizes specialized equipment and skilled professionals. Scheduling a regular drain camera inspection service is one way that you can prevent the worst plumbing issues or repair those ongoing and recurring problems on your drain. If you are looking for a tested and proven drain camera inspection service in Rochester, New York our team of expert plumbers is ready to help you! Contact us today to book an appointment.
Read More

How To Unfreeze Frozen Pipes Safely And Efficiently

Leone Plumbing and Heating How To Unfreeze Frozen Pipes Safely And Efficiently One of the problems that you may encounter during the winter season is frozen water pipes. If the weather is cold, freezing water expands which adds pressure to the plumbing pipes. This unyielding pressure may cause the pipes to crack, eventually leaking the water inside your home. Learning how to unfreeze frozen pipes safely and efficiently can save you from trouble and untimely repairs due to water damage.

Preventing Your Pipes From Freezing

Before discussing how to unfreeze frozen pipes, we should also remember that prevention is still the best remedy. Before the winter season comes, make sure that you take the following initiatives to protect your pipes from getting frozen.
Insulate the pipes.
You can insulate the pipes with pipe wrap or pipe insulation. The wrap comes in rolls and can be spun around the pipe. Pipe insulation is a foam tube that can be put around pipes. Pipe insulation comes in different lengths and snaps over the pipe. Another product available is electric heat tape. Heat tape is a plug-in wire system that can be run along copper pipes to keep it from freezing. This can be added under pipe insulation and will only turn on when the temperature reaches a certain point.
Adjust the thermostat accordingly.
Always maintain your thermostat set at the same temperature from morning to evening. This can also reduce the tension in the furnace during extreme cold weather. If you plan to leave the house for a few days, you can lower your home’s thermostat but don’t set it below 59 Degrees Fahrenheit.
Allow a faucet to drip overnight or when you are away.
Allowing water to run a small but steady drip can prevent ice from forming inside those pipes when temperatures are freezing. Ice cannot form when water is moving.
Open cabinet doors.
If your kitchen and bathroom pipes are near the exterior walls, we recommend that you leave the cabinet doors open. This will allow warm air to circulate and may help prevent burst pipes.
Seal cold air leaks.
Cold air can enter your home through holes where electrical wiring, pipes, duct work, or dryer vents are installed. Seal those gaps and locate other areas where cold air can enter.

How To Unfreeze Frozen Pipes?

Despite the effort of protecting your pipes from getting frozen, it is still possible that you will end up with frozen pipes. So how can you unfreeze frozen pipes safely and efficiently? Here are some of the tips we can share. unfreeze frozen pipes with a thawing machine, hair dryer, and fan heater
Get a thawing machine.
If you live in places that often get freezing temperatures, it is a wise decision to invest in getting a thawing machine. This machine can help to get water flowing and reduce the risk of having pipes burst.
Use a hair dryer as a source of heat.
If you use a hair dryer to thaw a frozen pipe, do this with caution. This procedure works best on metal pipes. If your pipes are plastic, be careful since hair dryers can melt plastic pipes. PVC pipes can be damaged at temperatures as low as 140 °F (60 °C). Do not use other appliances stronger than a hair dryer.
Blow a fan heater into outdoor vents.
Blowing warm air into an external vent can quickly thaw any pipes that are nearby. Pipes often run alongside ductwork, so enforcing warm air into the ducts is a good idea.

When To Ask For Help From A Plumber?

Learning how to unfreeze frozen pipes during winter seasons can help you save time and money from untimely repairs. But expect the unexpected! If all efforts are in vain despite all the know-how to unfreeze frozen pipes, then it’s time for a professional plumber to handle the issue. Sometimes, it is easy to thaw frozen pipes by yourself. But if things are getting out of hand, it is better to contact Rochester New York’s best plumbers! Contact us anytime and we are here to take care of your frozen pipes concern.  
Read More