 Tired of your toilet constantly running and wasting water? It might be time to replace your toilet fill valve. A faulty fill valve can lead to inefficient flushing and water leaks, adding unnecessary costs to your water bill. Fortunately, toilet fill valve replacement is a relatively simple DIY project that can be done in just a few steps.
In this article, we will walk you through the process of replacing your toilet fill valve for more efficient flushing. We will cover everything from gathering the necessary tools to removing the old fill valve and installing the new one. By the end, you’ll have a fully functional fill valve that will help conserve water and reduce your utility expenses.
How Can I Tell If I Need A Toilet Fill Valve Replacement?
The toilet fill valve is a crucial component of your toilet’s flushing mechanism. Specifically, it is responsible for refilling the tank with water after each flush, ensuring a proper and efficient flush every time. Over time, however, the fill valve can become worn, damaged, or malfunction, which eventually leads to various issues that need attention.
For example, one of the most common signs that your toilet fill valve needs replacing is a constantly running toilet. If you hear the sound of water continuously running in your toilet tank, it’s likely that the fill valve is not sealing properly, therefore allowing water to continuously flow into the tank. As a result, this not only wastes water but can also lead to higher water bills and potential water damage in your bathroom.
Additionally, another sign that your fill valve needs attention is if the water level in the tank is consistently too high or too low. Ideally, a properly functioning fill valve should maintain the water level at the appropriate height, as specified by the manufacturer. However, if the water level is constantly fluctuating or not reaching the desired level, it’s time to consider replacing the fill valve. This issue, in turn, can lead to inefficient flushing and water waste.
Tools And Materials Needed For Replacing A Toilet Fill Valve
A toilet fill valve replacement can be done DIY if you have enough time and knowledge about plumbing. Before you begin the process of replacing your toilet fill valve, it’s important to gather the necessary tools and materials. This will ensure a smooth and efficient installation process, allowing you to complete the task quickly and effectively. With the following tools and materials ready, you’ll be equipped to replace your toilet fill valve quickly and easily.
Tools:
1. Adjustable Wrench
This is used to loosen and tighten the water supply line and fill valve nut.2. Sponge or Towel
A sponge or towel is used to soak up any remaining water in the toilet tank before you start working.3. Bucket
You must have a bucket because you will use it to catch any water that may drain from the tank when the old valve is removed.4. Pliers
Helpful for gripping small parts or tightening connections.5. Screwdriver
Some toilet setups may require a flathead or Phillips screwdriver for removing tank bolts.Materials:
1. Replacement Fill Valve
Make sure that you purchase a compatible fill valve that fits your toilet model.2. Flexible Water Supply Line
If your current supply line is old or worn, it’s a good idea to replace it at the same time.3. Washers and Seals
Many fill valve kits come with replacement washers and seals to ensure a leak-proof installation.4. Teflon Tape (Optional)
This can be used on threaded connections to prevent leaks.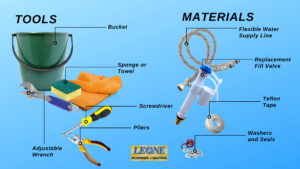
Step-By-Step Guide For Toilet Fill Valve Replacement
With the tools and materials ready for your toilet fill valve replacement, it’s time to get started! Follow this step-by-step guide to successfully replace your toilet fill valve.Step 1: Turn Off the Water Supply
Locate the water shutoff valve near the toilet base. Turn it clockwise to stop the flow of water to the tank. Flush the toilet to empty most of the water from the tank. Use a sponge or towel to soak up any remaining water.Step 2: Disconnect the Water Supply Line
Using an adjustable wrench, loosen the nut that connects the water supply line to the bottom of the fill valve. Place a bucket under the connection to catch any water that may spill.Step 3: Remove the Old Fill Valve
Below the tank, locate the nut securing the fill valve to the bottom of the tank. Use pliers or your wrench to loosen and remove it. Once the nut is removed, lift the old fill valve out of the tank.Step 4: Install the New Fill Valve
Clean around hole on the toilet tank and insert the new fill valve. Adjust the height of the fill valve according to the manufacturer’s instructions, ensuring it sits just above the overflow tube. Secure the valve in place by tightening the nut underneath the tank.Step 5: Reconnect the Water Supply Line
Attach the water supply line to the bottom of the new fill valve. Use the wrench to tighten the connection, but don’t overtighten as this can damage the threads.Step 6: Adjust the Water Level
Turn the water back on by opening the shutoff valve. Let the tank fill, and check the water level. Most fill valves have an adjustment screw to raise or lower the water level as needed.Step 7: Test the Flush and Check for Leaks
Flush the toilet and watch the fill valve in action. Ensure the water stops filling at the correct level and check for any leaks around the connections.Maintenance Tips To Keep Your Toilet Fill Valve In Good Condition
To ensure your newly installed toilet fill valve continues to function properly, it’s important to perform regular maintenance and inspections. This will help prolong the life of the fill valve and prevent any future issues.
One of the most important maintenance tasks is to regularly check the fill valve for any signs of wear or damage. Look for cracks, leaks, or other visible issues, and address them promptly to avoid further problems. You can also check the float and make any necessary adjustments to maintain the proper water level in the tank.
Additionally, it’s a good idea to clean the fill valve periodically to remove any mineral buildup or debris that may have accumulated over time. You can do this by disconnecting the fill valve from the tank and giving it a thorough cleaning with a mild detergent and water. Rinse it thoroughly and reinstall it, making sure all connections are tight and secure.
Enjoy Efficient Flushing With A New Toilet Fill Valve!
Replacing a toilet fill valve is a relatively simple DIY project that can have a significant impact on your home’s water efficiency and cost savings. By addressing the signs of a malfunctioning fill valve, such as a constantly running toilet or inconsistent water levels, you can ensure your toilet is flushing properly and conserving water.
A toilet fill valve replacement is a simple work that you can handle on your own. However, it’s important to have some basic plumbing knowledge and experience to ensure the job is done correctly. Without proper know-how, you risk causing leaks or damaging the toilet, which could lead to costly repairs. If you’re unsure, consider consulting a professional to avoid any potential issues.
Are you in Rochester, NY, and need a reliable and trusted plumber to replace your toilet fill valve? Look no further! Contact us today at Leone Plumbing & Heating. Our team of licensed, professional plumbers in Rochester is ready to assist you with all your plumbing needs. Don’t wait—reach out for expert service!
 Have you noticed sweat-like droplets around your toilet tank? If you do, is it something that you should be concerned about? Toilet sweating is caused by the moisture or condensation on the toilet tank. This condensation leaves your bathroom floor damp for several days. Let’s talk more about toilet sweating and what can we do about it.
 If you keep on seeing puddles of water around the toilet and on the bathroom floor, it can be more than toilet sweating. It’s possible that the culprit is not the condensation on the toilet tank. You might be dealing with a serious plumbing issue! If this happens,
  Your toilet can show unusual signs if there is something wrong with it. One sign that you should be concerned about is when you see bubbles in the toilet. If the toilet is bubbling with an unusual gurgling sound after you flush, it could indicate that there is a problem. You should not ignore these signs! Today, let’s discuss why this could be happening and potential solutions.
 Water damage caused by a failing plumbing system is probably the worst scenario your house may encounter. It’s destructive, time-consuming, and disrupts your household activities. But thanks to social media and the internet! An average person can now do plumbing repairs with step-by-step procedures provided online. However, we can’t avoid repairs that are beyond our basic knowledge and experience. There are complex plumbing works that have to be dealt with by a
  One way to create a healthy community is by being inclusive to all individuals, especially to people with disabilities (PWD). It’s good to know that there are
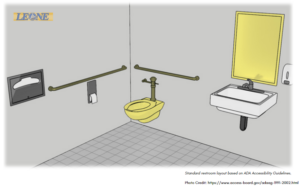
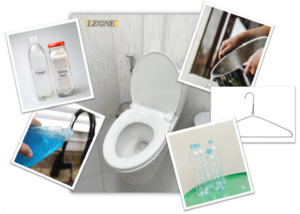 Unexpected situations can happen anytime. It may stress us but also push us to become resourceful in resolving a problem. Take it as an example if you deal with a clogged toilet without a plunger. Dealing with a clogged toilet without any tool on hand can be a nightmare! So how to unclog a toilet without a plunger? In this article, we will discuss other resources you can find at home which you can use to deal with a clogged toilet.