DIY Guide On How To Relight A Pilot Light On Your Water Heater

how to relight pilot light on water heater instructions by Leone PlumbingIs your water heater producing lukewarm or cold water? Before you pick up the phone to call a professional, you might be able to fix the problem yourself. In this DIY guide, we’ll show you how to relight the pilot light on your water heater step by step. With just a few simple tools and a little know-how, you can potentially save yourself time and money. In this comprehensive guide, we’ll cover everything you need to know, from identifying whether your pilot light is out to safely relighting it.

Signs That Your Water Heater Pilot Light Needs Relighting

Before you figure out how to relight a pilot light on the water heater you need to observe the signs. Here are some common signs that your pilot light may be out and needs relighting:

1. No hot water:

If you turn on the hot water tap and only get cold or lukewarm water, it’s likely that your pilot light is out. Without a working pilot light, the burner won’t ignite, resulting in no hot water.

2. Pilot light won’t stay lit:

If you’ve noticed that your pilot light keeps going out, even after relighting it, there may be an underlying issue causing the flame to extinguish. This could be due to a faulty thermocouple or a problem with the gas supply.

3. Gas smell:

If you detect a strong odor of gas near your water heater, it’s crucial to act quickly. A gas leak can be hazardous, so turn off the gas supply and ventilate the area immediately. In this case, do not attempt to relight the pilot light yourself and call a professional right away.

Important Note To Remember: 

These signs indicate that you may need to relight your pilot light, but it’s essential to follow the proper safety precautions before attempting to do so.

Safety First Before You Relight The Pilot Light On Your Water Heater

Before you begin the process of relighting your water heater pilot light, it’s crucial to take the following safety precautions:

1. Turn off the gas supply:

Locate the gas shut-off valve near your water heater. Turn the valve to the “off” position to cut off the gas supply. This step is crucial to prevent any gas leaks or accidents while you work on relighting the pilot light.

2. Allow time for gas to dissipate:

After turning off the gas supply, it’s important to allow some time for any remaining gas to dissipate. Open windows or doors to ventilate the area and ensure there are no lingering gas fumes.

3. Read the manufacturer’s instructions:

Each water heater may have slightly different instructions for relighting the pilot light. Take the time to read the manufacturer’s instructions carefully to ensure you understand the process and any specific safety considerations.

Step-by-step Guide To Relighting A Water Heater Pilot Light

Now that you’ve taken the necessary safety precautions, let’s dive into the step-by-step process of relighting your water heater pilot light:

Step 1: Access the pilot light assembly

First, locate the access panel on your water heater. This panel is typically located near the bottom of the unit. Next, remove the panel by unscrewing or lifting it, depending on the type of water heater you have. Once the panel is removed, you should have clear access to the pilot light assembly.

Step 2: Locate the pilot light and gas control knob

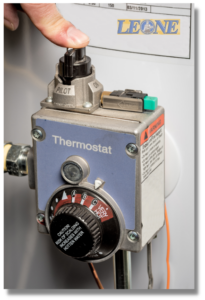
Look for the gas control knob on the front of the water heater. This knob is usually labeled and will have settings such as “on,” “off,” and “pilot.” Then set the gas control knob to the “off” position. This ensures that the gas supply to the pilot light is shut off.

Step 3: Wait for the gas to dissipate

After turning the gas control knob to the “off” position, give the gas a few minutes to dissipate. This will help ensure there are no lingering gas fumes when you relight the pilot light.

Step 4: Locate the pilot light

Look for the pilot light assembly near the bottom of the water heater. It usually consists of a small tube with a metal tip. Next, locate the pilot light orifice, which is a small opening where the gas is released to ignite the flame.

Step 5: Light the pilot light

With a long-reach lighter or fireplace match in hand, carefully bring the flame close to the pilot light orifice. While holding the flame near the orifice, turn the gas control knob to the “pilot” position. Press the knob down and hold it in this position to allow gas to flow to the pilot light. Continue to hold the knob down while you ignite the gas by bringing the flame closer to the orifice. Once the pilot light is lit, continue holding the knob down for about 20-30 seconds to ensure the flame stays lit. After 20-30 seconds, release the knob and the pilot light should remain lit.
Step 6: Test the pilot light

Turn the gas control knob to the “on” position. Then, return the access panel to its original position and secure it. Wait for a few minutes for the water heater to heat up. Lastly, turn on a hot water tap to check if the hot water is flowing consistently. If the water is hot, then the pilot light is successfully relit.

Disclaimer:

While it is a good idea to do things DIY, it can be a dangerous task for people who are not experienced. We recommend having a licensed and insured technician assist with this job.

When To Call A Professional For Help With Relighting The Pilot Light

Good job if you were able to successfully relight your water heater pilot light on your own. However, if you encounter any issues during the process or if the pilot light continues to go out, there may be underlying problems that require professional assistance. If things get out of hand, it’s time to pick up the phone and call an expert plumber to fix the issue. So don’t look anywhere! Call Rochester New York’s best plumbers to help you. Contact us right away if you need help in fixing your water heater.
Read More

Deciding Between Water Heater Repair Or Replacement

Water Heater Repair Or Replacement By Leone PlumbingThe water heater is an essential appliance that we use almost every day in the kitchen, shower, and laundry. We need it most especially during the winter to keep us warm. But what would you do if your water heater is no longer heating up or if it is leaking? Would you go with water heater repair or replace the whole unit? What are the things you need to know before deciding?
Life Expectancy Of A Water Heater

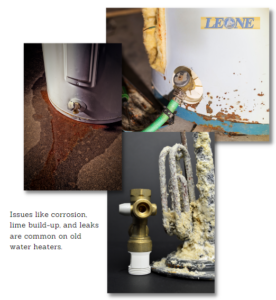
Knowing the age of your water heater can help you decide whether to replace the unit or go on with the repair. Usually, a water heater may last up to 12 years depending on how it is maintained. The unit can be prone to leaking and tends to be working inconsistently if it is more than 10 years old. However, a professional plumber can extend the life of the unit through simple repairs like replacing the pressure relief valve. It may save you from buying a new water heater.

When Is Water Heater Repair Necessary?

Leone Plumbing water heater repair serviceLooking out for the following red flags can help you determine if your water heater needs repair. If you are experiencing these signs, it is best to contact a professional plumber.
Water Is No Longer Heating
Over time, lime sediments may build up inside the tank reducing the capacity of the water heater. The accumulated build-up of sediments reduces the available water to be heated.
Rusty Water
The corrosion inside the tank may become obvious through the water that is coming out from the unit. If you can find rust in your water, it is an indication that the water heater is breaking down inside due to corrosion.
Leaking Water
Check the seams and joints of your water heater regularly if there are any leaks. The appliance is designed to be a tight or closed system and moisture outside of it means something is wrong inside. Persisting leaks on your unit call for a water heater repair.
Unusual Noise
If your water heater is making a rumbling noise while in operation, it means that the system is struggling to work properly. Something might be interfering with the water heater and preventing it from working normally. Hearing this odd noise indicates that your water heater needs to be checked and repaired immediately.

When To Buy A New Water Heater?

If your water heater is more than 10 years old and beyond repair, then it’s time to get a new one. If you are not sure about the age of the unit, look for it’s brand and serial number then check with the InterNACHI resource to find out. Before purchasing a new water heater, think about the following.
Gallon Capacity and Recovery Rate
Find out the number of gallons the heater can heat on an hourly basis.
Actual Dimension
You need an accurate measurement of the area where you will put the unit. Get the exact height and width.
Look for the Efficiency Rating
You can save energy and money with high-efficiency water heater units. Look for the sticker (usually on the side) that lists the estimated operational cost of the unit.

Need A Water Heater Repair or Installation Service?

We always have you covered! We are Rochester New York’s best plumbers and we are here for your water heater repair or installation. Contact us and we’ll talk to you soon!
Read More

Plumbing Repairs That Should Not Be Done DIY

Professional plumbing repairs solution by Leone PlumbingWater damage caused by a failing plumbing system is probably the worst scenario your house may encounter. It’s destructive, time-consuming, and disrupts your household activities. But thanks to social media and the internet! An average person can now do plumbing repairs with step-by-step procedures provided online. However, we can’t avoid repairs that are beyond our basic knowledge and experience. There are complex plumbing works that have to be dealt with by a professional plumber.
Emergency Plumbing Repairs That Shouldn’t Be DIY

Burst Pipes

Broken pipes usually happen during the winter. Extreme cold weather can make the pipes brittle and then burst when water pressure comes in, leaving your home flooded. A burst pipe is a complex repair issue that should be fixed quickly. This has to be dealt with by a professional plumber. A professional makes sure that the pipes are fixed and prevent future leaks and pipe rupture.

Water Heater Malfunction

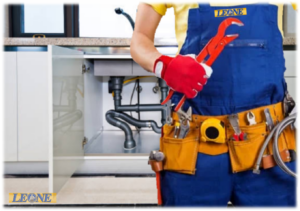
A water heater can be a dangerous house appliance when it fails. You should NOT resort to DIY solutions as it requires a professional hand to fix the water heater parts. If your water heater makes an unusual sound, leaks, and smells (leaking gas), these are the signs that it’s failing and you need to seek help from a professional plumber.

Clogged Sewer Line

Clog issues caused by tree root invasion or other obstructions are a mess when done DIY. Issues with clogging pipes require professional attention and expertise. A professional has the necessary tools and equipment to get rid of roots invading your lines and also those hard obstructions such as rags, small toys, hairs, and accumulated oils.

Sump Pump Failure

This is another plumbing appliance that is often overlooked until a failure happens. A sump pump failure may happen during heavy rain or snow which causes basement flooding. There are many factors why a sump pump may fail. The most common issues are clogs and other obstructions in the sump pit, leaking pipes, and even the loss of a power source. A professional plumber knows what is best in dealing with these kinds of plumbing issues in the sump pump.

DIY Repair or Call a Professional Plumber?

Plumbing repairs are made easy nowadays and anyone can be an “expert” in their own right. Thanks to the DIY solutions available online everyone can search on the internet! DIY solutions are helpful especially during emergency repair situations. Though DIY plumbing can be adequate, there are still repairs that need to be done by a professional. If you feel you lack the experience and knowledge in handling plumbing repairs by yourself, it is the best solution to contact a professional. You can always contact us and our team of professionals can help you with your emergency plumbing repairs.
Read More

Water Heater Maintenance: How Is Descaling Done Professionally?

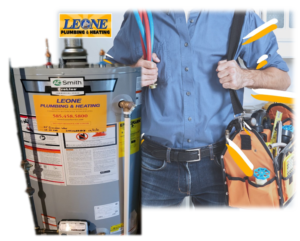
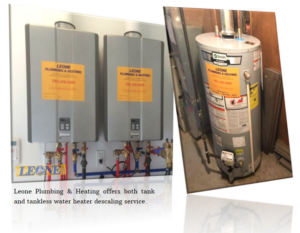
Leone Plumbing & Heating Water Heater Maintenance ServiceWater heater maintenance should be done regularly to prolong the life of your water heater. One way that you can maintain your water heater is through descaling. Descaling is a must and should be done at least every 2 years. This is an essential water heater maintenance solution that should not be missed! But how would you do it? Would you do it yourself (DIY) or by a professional?
Why Is It Better To Let A Professional Perform Descaling?

Nowadays, you can easily access information online that can provide you with steps on how to descale your water heater. While DIY descaling can be a thrilling and fun experience, it can further escalate the problem and can create much damage if you mess up. If you fail due to a lack of professional experience, it will not only cause you stress but would also cost you a lot of money. You will then realize that it is more cost-effective for a professional to perform descaling rather than doing it yourself with uncertainty. Water heater maintenance can be easy (which you can resort to DIY solutions) and can also be complicated. In the case of descaling, it can be complicated if you’re not familiar with the parts of your water heater. That is why you should let a professional plumber handle the descaling.

How Does A Professional Plumber Do The Descaling?

Professional Plumbers are certified and well trained to handle the descaling of your water heater. They have hands-on experience in how to locate the pipes and open up the wall if needed. Descaling can be a complicated water heater maintenance solution. It involves detaching and reconnecting the water heater and a professional is good with these tasks. To descale the water heater, a professional plumber performs the following steps.
  • Disconnect (turn off) the heater from its power source.
  • Valves are closed to stop the cold water to fill the heater.
  • The valves that connect the water heater to the home are also closed.
  • To relieve the pressure, purge valves are opened to keep the rubber washers.
  • Hosing lines are attached depending on the model of the water heater.
  • Re-open the purge valves.
  • Run a descaling solution down the water heater to remove the scales.
  • Flush and drain for at least 45 minutes following the manufacturer’s instructions.
  • Before disconnecting the hose, purge valves are closed.
  • The water heater is then reconnected to the home’s water system.
  • Switch on the water heater to restart.

Let A Professional Do The Descaling For You

For complicated water heater maintenance jobs such as descaling, it is always the right choice to trust a Professional Plumber to do the job. They are more experienced, equipped, trained, and have the know-how in dealing with water heater descaling. Contact us if you seek professional help. Schedule an appointment with us today!Water Heater Maintenance Service By Leone  
Read More

Regular Descaling As Preventive Maintenance On A Hot Water Heater

Descaling As reventive Maintenance On A Hot Water Heater By Leone PlumbingOne of the issues that your water heater may encounter is scale build-up. Most of the time, the water coming into the water heater contains calcium and magnesium and they become visible when water evaporates. When the water level is low, it evaporates and leaves a chalk-like substance or scale on the water heater. Scale or also called “limescale”, can build up over time which may damage your appliance. That is why regular descaling should be considered as preventive maintenance on a hot water heater.
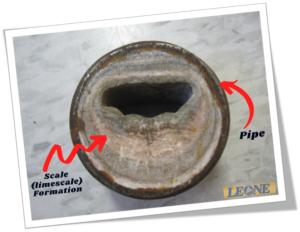
Descale Your Water Heater For Optimal Efficiency

Your water heater serves many purposes in your home. You use hot water for baths, laundry, cooking, household cleaning, and more. That is why your water heater should function well. It’s important to regularly perform descaling as preventive maintenance on a hot water heater to ensure that it is working efficiently. If you allow scales to accumulate on your water heater, it may affect the performance of the appliance. Scale build-up has bad effects on your heater and it should be prevented.

What Are The Bad Effects Of Scale Build-up On Your Water Heater?

Too much build-up of scale in a water heater causes the electrodes to malfunction untimely. Scale build-up lessens the capacity of the water heater to generate heat. This will cause the electrodes to operate higher than their capacity. Thus, causing the electrodes to deteriorate because of exhaustion. The build-up of scale creates an insulated barrier between the water and the source of heat. This will make the metal at the base of the tank become hotter than usual and will lead to leaks or tank failure. It will be costly to replace the entire water heater system if that happens! That is why regular descaling as preventive maintenance on a hot water heater should be practiced. Descaling By Leone Plumbing And Maintenance On A Hot Water Heater

Professional Descaling Of Water Heater

Regular descaling as preventive maintenance on a hot water heater can prolong the life of the appliance. The process of descaling involves detaching and reconnecting the water heater. You should ask for a professional plumber to do it for you to avoid further damage. Otherwise, it will cost you more money if you do it yourself and fail. It is always a wise decision to seek the help of a professional to descale your heater for the safety of your household. If DYI descaling goes wrong, it may not only harm the heater but also the health of your family. You may incorrectly use harsh descaling chemicals that can leave a residue and contaminate your drinking water.

Speak With A Professional To Descale Your Heater

When it comes to preventive maintenance on a hot water heater, it is always a good idea for a professional to do it for you. Descaling of the water heater is best done by a professional plumber to ensure everything is executed properly. We’ll be glad to talk to you! Contact us today to set up an appointment.
Read More

Common Causes Why Your Tankless Hot Water Heater Is Leaking

Leone Plumbing Tankless Water Heater InstallationA tankless water heater is the best choice when it comes to energy efficiency. If you compare it with tank-style water heaters, it will only spend energy when a hot water tap is turned on or if there is an appliance being used. Since it doesn’t come with a tank, most homeowners believe that a tankless water heater doesn’t leak. However, a tankless water heater can still be susceptible to leaks. Proper care and maintenance still play an important role in the longevity of this appliance.
What causes a tankless water heater to leak and how can we deal with it?

Contrary to what everyone thought that a tankless water heater is leak-free, this appliance can begin to leak after years of use. Here are the common causes of leaks on tankless water heaters.
Improper Venting
If not properly vented, condensation can cause leaks on your water heater. It is best to follow the manufacturer’s instructions before installing the appliance. The boiler should have proper venting through its roof or wall.
High Water Pressure and Flow Rates
For optimal performance, a tankless water heater requires low flow rates at 5 GPM and pressure at 30 PSI. If it goes beyond the allowed pressure and flow rates, it may cause leaks. Always monitor the pressure and flow rates and ensure that the required numbers are maintained.
Pipe Connections
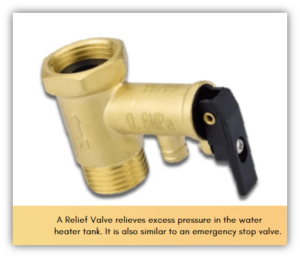
Most tankless heaters are equipped with a relief valve, but some are not. Without a relief valve, there will be a build-up of pressure in the pipe joints which can cause leaks. Make sure that your water heater has a relief valve. Otherwise, our licensed plumbers can help you find and install a relief valve that will fit your heater. Tankless Water Heater Relief Valve Water Heater Install by Leone Plumbing
Hard Water
Particles such as calcium, lime, and other minerals are present in hard water. Over time, they build up like sediment that can affect the heat exchanger which will overheat the appliance and will cause leaks as well. Regular descaling can minimize and prevent sediment build-up on your tankless heater.
Acidic Water
Corroding pipes are a leading cause of leaks on tankless heaters. Acidic water can corrode pipes and creates a pinhole that grows over time. To prevent the risk, acidic water has to be monitored and neutralized.
Insufficient Gas Pipes
You need to ensure that the gas pipes have enough room to supply the necessary amount of gas demanded by the water heater. If not, leaks from gas pipes can bring a serious problem to your home! To prevent gas problems, it is recommended to have a separate line that runs from the meter to the heater without rerouting the gas main.

You Can Combat Leaks On Your Tankless Heater

Knowing the causes of leaks on a tankless heater can help you maintain your appliance so you can use it for a long time. If you need help or if you have concerns with your tankless heater, we are here for you! Contact us anytime.
Read More