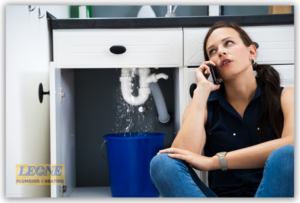
Did you know that a small water leak can waste up to 10,000 gallons of water in a single year? Not only is this detrimental to the environment, but it can also lead to skyrocketing water bills. If you’re tired of wasting water and money, it’s time to take action. In this article, we’ll share the essential tips for effective water leak repair.
From identifying leaks to fixing them promptly, we’ll provide you with practical and cost-effective solutions to prevent water waste in your home. By following these tips, you’ll not only save water but also contribute to conserving the planet’s vital resources. Don’t let a small leak turn into a big problem. Join us as we dive into the world of water leak repair and empower you to take control of your water usage.
The Importance of Water Leak Repair
Water leak repair is crucial for several reasons. Firstly, it helps to conserve one of our most precious resources – water. With water scarcity becoming an increasingly pressing issue worldwide, it’s essential that we do our part to minimize waste. By repairing leaks promptly, you can significantly reduce the amount of water wasted in your home.
Secondly, water leaks can lead to significant financial losses. Even a small leak can cause your water bills to skyrocket. By fixing leaks, you can save money in the long run and avoid unnecessary expenses.
Moreover, water leaks can cause damage to your property. Moisture can lead to mold growth, rotting wood, and structural damage, which can be expensive and time-consuming to repair. Taking care of leaks promptly can help prevent these issues and maintain the integrity of your home.
Common Causes of Water Leaks
Water leaks can occur due to various reasons. Understanding the common causes can help you identify and prevent leaks in your home.
One of the most common causes of water leaks is worn-out or faulty plumbing fixtures. Over time, rubber seals, gaskets, and washers can deteriorate, causing leaks. Faucets, showerheads, and toilet flappers are common culprits. Regularly inspecting and maintaining these fixtures can help prevent leaks.
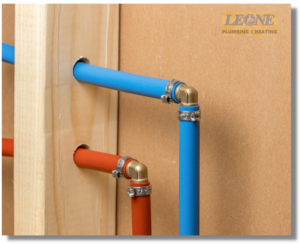
Another common cause is pipe damage. Pipes can develop cracks or leaks due to age, corrosion, or external factors like tree root growth. Freezing temperatures can also cause pipes to burst. Inspecting your pipes regularly and addressing any issues promptly can help prevent water leaks.
Poor installation can also lead to water leaks. If plumbing fixtures or pipes are not installed correctly, they may not be properly sealed or connected. This can result in leaks over time. Hiring a professional plumber for installations can help prevent these issues.
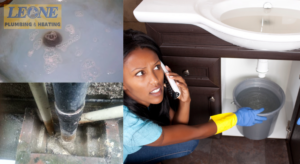
Signs of a Water Leak
 Detecting water leaks early is crucial for timely repair. Here are some common signs that indicate you may have a water leak in your home:
- Unexplained Increase in Water Bills: If you notice a sudden spike in your water bills without any change in your water usage, it could be a sign of a leak. Is your water meter running?
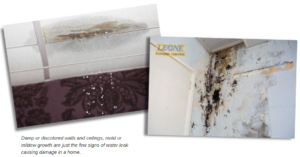
- Damp or Discolored Walls and Ceilings: Water leaks can cause moisture to seep into walls and ceilings, leading to dampness or discoloration.
- Mold or Mildew Growth: Excess moisture from leaks can create an ideal environment for mold and mildew to thrive. If you notice mold or mildew in your home, it may indicate a water leak.
- Musty Odors: Water leaks can cause a musty smell in the affected area. If you notice a persistent musty odor, it’s worth investigating for leaks.
- Pooling Water or Puddles: Obvious signs of a leak include puddles or pooling water in or around your home. This may indicate a burst pipe or a leaky plumbing fixture.
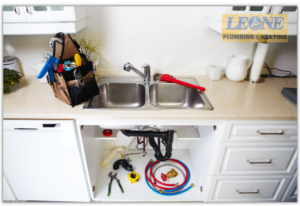
Tips for Effective Water Leak Repair
Now that you know the common causes and signs of water leaks, it is time that we talk about the essential tips for an effective water leak repair.- Identify the Source of the Leak:
- Thoroughly inspect the area to determine where the leak originates. Common sources include faucets, pipes, toilets, and water heaters. Use tools like moisture meters and dye tablets to pinpoint the exact location of the leak.
- Turn Off the Water Supply:
- Before beginning any repair work, shut off the water supply to prevent further water damage. This might involve closing a local shut-off valve or turning off the main water supply to the house. Ensure all water fixtures are drained by opening the faucets and flushing toilets.
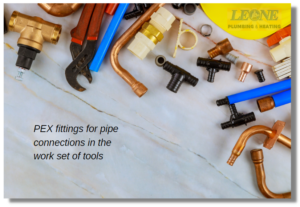
- Use the Right Tools and Materials:
- Equip yourself with the appropriate tools and repair materials. Depending on the type of leak, you might need pipe wrenches, Teflon tape, pipe repair clamps, epoxy putty, or replacement parts. Always choose high-quality materials to ensure a long-lasting repair.
- Follow Proper Repair Techniques:
- Adhere to standard repair procedures for the specific type of leak. For example, if dealing with a leaking pipe joint, ensure you apply Teflon tape correctly and tighten the joint adequately. For patching holes, clean the area thoroughly and apply the patching material as directed by the manufacturer.
- Test the Repair and Monitor for Recurrence:
- After completing the repair, gradually turn the water supply back on and observe the area for any signs of continued leaking. Check all connections and repaired areas to ensure they are watertight. Monitor the area over the next few days to ensure the leak has been fully resolved and to catch any early signs of recurrence.
DIY Water Leak Repair Tips
While some water leaks may require professional assistance, there are several DIY tips you can follow to repair minor leaks yourself. Here are some effective DIY water leak repair tips:- Fixing a Dripping Faucet: A dripping faucet is not only annoying, it is wasteful. Faucet leaks can occur when there is a worn-out or faulty rubber washer. Turn off the water supply, remove the faucet handle and stem, and replace the washer. Reassemble the faucet, and the leak should be fixed.
- Repairing a Leaky Toilet: A toilet with a minor leak can waste 30-250 gallons of water a day. To fix a leaky toilet, start by turning off the water supply. Remove the tank lid and inspect the flapper. If it’s damaged or worn out, replace it with a new one. Additionally, check the float on the fill valve and adjust it if necessary. Turn on the water supply, and the leak should be resolved.
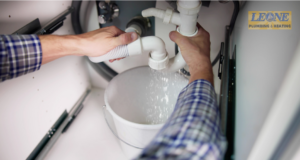
- Sealing Leaky Pipe Joints: Pipe joints can develop leaks due to loose connections or worn-out sealing material. Start by turning off the water supply. Disconnect fittings, clean the joint thoroughly and apply plumber’s tape or pipe sealant. Tighten the joint securely, and turn on the water supply to check for any further leaks.
- Replacing Faulty Showerheads: Leaky showerheads can waste a significant amount of water. If your showerhead is leaking, remove it and inspect the washer and O-ring. If they’re damaged, replace them. Apply the plumber’s tape to the shower arm threads and reattach the showerhead securely.
- Fixing a Leaking Washing Machine Hose: Leaks in washing machine hoses can cause water damage. Turn off the water supply and unplug the machine. Inspect the hoses for cracks or bulges. If any issues are found, replace the hose with a new one and tighten the connections.
When to Hire a Professional for Water Leak Repair
 While minor leaks can often be handled with a DIY approach, there are situations where hiring a professional is the best course of action. Professionals bring the expertise, tools, and experience necessary to handle complex, persistent, or major leaks safely and effectively. By recognizing when to seek professional help, homeowners can protect their property from extensive damage and ensure the longevity and reliability of their plumbing systems.
If you are in the Rochester, New York area and looking for a reliable and trusted plumber to fix your water leak concern, contact us, and we are here to help! We are a team of professional plumbers here in Rochester, New York, dedicated to providing top-notch plumbing services to our community. Whether you’re dealing with persistent water leaks, clogged drains, faulty water heaters, or any other plumbing issues, our experienced and skilled team is here to help. We pride ourselves on our prompt, reliable service and commitment to customer satisfaction, ensuring that your plumbing systems are functioning efficiently and effectively. Trust us to handle all your plumbing needs with the expertise and care you deserve.
While minor leaks can often be handled with a DIY approach, there are situations where hiring a professional is the best course of action. Professionals bring the expertise, tools, and experience necessary to handle complex, persistent, or major leaks safely and effectively. By recognizing when to seek professional help, homeowners can protect their property from extensive damage and ensure the longevity and reliability of their plumbing systems.
If you are in the Rochester, New York area and looking for a reliable and trusted plumber to fix your water leak concern, contact us, and we are here to help! We are a team of professional plumbers here in Rochester, New York, dedicated to providing top-notch plumbing services to our community. Whether you’re dealing with persistent water leaks, clogged drains, faulty water heaters, or any other plumbing issues, our experienced and skilled team is here to help. We pride ourselves on our prompt, reliable service and commitment to customer satisfaction, ensuring that your plumbing systems are functioning efficiently and effectively. Trust us to handle all your plumbing needs with the expertise and care you deserve. Are you in need of a plumbing contractor but overwhelmed by the options available? Choosing the right professional for the job can make all the difference in the quality of work and customer satisfaction. But what qualities should you look for? In this article, we will explore the top qualities that make a plumbing contractor stand out from the crowd. Whether you’re dealing with a minor repair or a major plumbing project, these qualities can help you make an informed decision when hiring a contractor.

 Having a clean and functional drainage system is essential for a smooth-running household. However, over time, debris, grease, hair, and other materials can accumulate in your pipes, leading to clogs and potential damage. That is why regular residential drain cleaning is essential for a clean and well-maintained drainage system. If you are tired of dealing with stubborn clogs and plumbing issues in your residential drains, this article is for you! Don’t let clogged drains disrupt your daily routine. Follow our guide and experience the relief of a clog-free living space.
 Identifying a clogged drain early on is crucial for preventing further damage and resolving the issue promptly. If you notice any of these signs, it’s important to address the issue promptly to prevent further damage.
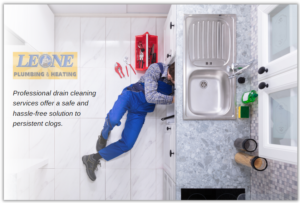
 Are you aware that corroded pipes could be silently damaging your home? If left unchecked, corroded pipes can lead to costly repairs, cause water leaks, and even create potential health hazards. That’s why early detection and proper maintenance of your plumbing system are crucial. In this article, we will share expert tips on how you can save your home from the perils of corroded pipes.
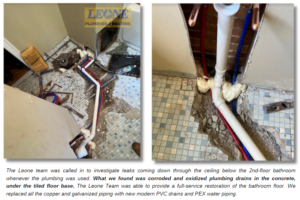 As Rochester, New York’s best plumbers, it is our goal to help you protect your home and your business from the perils of corroded pipes. We provide the right solution for your plumbing pipe maintenance and repair concerns. Don’t wait for problems to arise – start protecting your home today!
 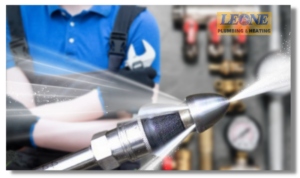 In the ever-evolving world of plumbing, advancements in technology continue to revolutionize the industry and provide more efficient and effective solutions for both plumbers and homeowners alike. One such breakthrough is the emergence of hydro jetter plumbing technology, a powerful tool that is changing the way plumbing professionals tackle tough clogs and blockages.