How to Properly Install PEX Pipe For A Leak-Free Home

Installing the right plumbing system is essential for a leak-free and hassle-free home. And when it comes to choosing the best piping material, PEX (cross-linked polyethylene) pipes are gaining popularity for all the right reasons. With their excellent flexibility, durability, and resistance to freezing, PEX pipes have become a preferred choice for homeowners and contractors alike. But proper installation is key to ensuring their leak-free performance. In this comprehensive guide, we will walk you through the step-by-step process of installing PEX pipes, from preparing the materials to connecting the fittings. We will also discuss the importance of using the right tools and techniques to achieve secure and reliable connections.
Advantages Of Using PEX Pipe For Plumbing
Another advantage of PEX pipe is its durability. Unlike copper, PEX pipe does not corrode or develop pinhole leaks over time. It is also resistant to scale build-up, ensuring consistent water flow and reducing the need for maintenance. PEX pipe is also quieter compared to metal pipes, as it absorbs water hammer and minimizes noise transmission. Moreover, PEX pipe is less expensive than copper, making it a cost-effective choice for plumbing projects.
Types Of PEX Pipe
Before you begin your PEX pipe installation, it is important to understand the different types and sizes of PEX pipe available. PEX pipe comes in three main types: PEX-A, PEX-B, and PEX-C. Each type has its unique characteristics and uses.
- PEX-A is the most flexible type of PEX pipe and can withstand repeated bending without losing its shape. This makes it ideal for installations that require many bends and curves.
- PEX-B is slightly less flexible than PEX-A but still offers excellent durability and reliability.
- PEX-C is the least flexible type, but it is also the most affordable option.
PEX Pipe Sizes
In terms of sizes, PEX pipe is available in various diameters, commonly ranging from 3/8 inch to 1 inch. The size you choose will depend on the water flow requirements of your plumbing system. It is important to select the appropriate size to ensure proper water pressure and flow.
When purchasing PEX pipe, be sure to check for industry certifications, such as the NSF (National Sanitation Foundation) certification, to ensure that the pipe meets quality standards and is suitable for potable water applications.
Step-By-Step Guide To Installing PEX Pipe
Before you begin installing PEX pipes, there are a few important steps you need to take to ensure a smooth and efficient installation process. Here’s what you need to do:
1. Plan your plumbing system: Determine the layout of your plumbing system, including the location of fixtures, supply lines, and drains. This will help you calculate the amount of PEX pipe and fittings you will need for the project.
2. Shut off the water supply: Before you start any plumbing work, make sure to shut off the main water supply to your home. This will prevent any accidents or water damage during the installation process.
3. Remove old pipes if necessary: If you are replacing an existing plumbing system, you will need to remove the old pipes before installing the PEX pipe. Follow proper procedures for removing old pipes, such as draining the water and using appropriate tools.
4. Prepare the work area: Clear the work area of any obstacles and ensure you have enough space to maneuver and work comfortably. Lay down protective sheets or tarps to protect the flooring or surfaces from any potential damage.
By properly preparing for the PEX pipe installation, you can minimize any potential issues and ensure a successful and efficient installation process.
Tips For Avoiding Leaks During PEX Pipe Installation 
Now that you have prepared for the PEX pipe installation, it’s time to dive into the step-by-step process. Follow these instructions to properly install PEX pipe for a leak-free plumbing system:
1. Measure and cut the PEX pipe: Measure the length of the pipe needed for each section of the plumbing system. Use a PEX cutting tool to make clean and straight cuts. Be sure to deburr the cut ends to remove any rough edges.
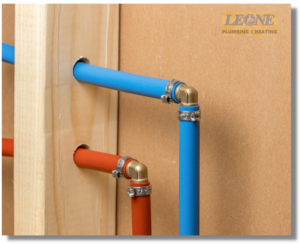
2. Insert the fittings: Slide a PEX sleeve onto the end of the PEX pipe. Insert the PEX fitting into the end of the pipe until it reaches the shoulder of the fitting. Ensure that the fitting is fully inserted and seated properly.
3. Crimp the connection: Use a PEX crimping tool to crimp the PEX ring around the fitting. Position the crimping tool over the crimp ring and squeeze the handles firmly until the tool is released. Repeat the crimping process on the other end of the fitting to create a secure connection.
4. Secure the PEX pipe: Use pipe hangers to secure the PEX pipe to the framing or other structural elements. Make sure to leave enough room for the pipe to expand and contract with temperature changes.
5. Connect the PEX pipe to fixtures and appliances: Use PEX fittings to connect the PEX pipe to fixtures, such as faucets and toilets, as well as appliances, such as water heaters and washing machines. Follow the manufacturer’s instructions for each specific connection.
6. Install the PEX manifold: If you are using a PEX manifold, install it in a central location and connect the PEX pipes to the manifold using appropriate fittings. The manifold will allow you to control the flow of water to different areas of the plumbing system.
7. Insulate the PEX pipes: Wrap pipe insulation around the PEX pipes to prevent freezing and reduce heat loss. Pay special attention to pipes located in unheated areas or near exterior walls.
By following these step-by-step instructions, you can ensure a proper and secure installation of PEX pipe for a leak-free plumbing system.
Maintaining And Troubleshooting PEX Pipe Systems
Once you have completed the installation of the PEX pipe, it is important to test and inspect the connections to ensure their integrity. Follow these steps to test and inspect the PEX pipe connections:
1. Close all fixtures and appliances: Make sure all faucets, toilets, and other fixtures are turned off. This will isolate the PEX pipe system and allow you to test the connections effectively.
2. Pressurize the system: Use a pressure gauge and a suitable pump to pressurize the PEX pipe system. Follow the manufacturer’s instructions for the specific pressure requirements of your system.
3. Inspect for leaks: Once the system is pressurized, visually inspect all the connections for any signs of leaks. Check the fittings, crimps, and sleeves for any water seepage or drips. If you notice any leaks, mark the location for repair.
4. Repair any leaks: If you find any leaks during the inspection, you will need to repair them immediately. Cut out the faulty section of the PEX pipe and replace it with a new one. Follow the proper procedures for cutting and connecting the new pipe.
5. Re-test the system: After repairing any leaks, re-pressurize the system and re-inspect all the connections. Make sure there are no new leaks and that all the connections are secure and leak-free.
By testing and inspecting the PEX pipe connections, you can identify and address any leaks before they cause significant damage to your plumbing system or property.
Installing PEX Pipe With A Professional
In the event of any problems or issues with installing your PEX pipe system, it is recommended to consult a professional plumber or the manufacturer for troubleshooting and repair guidance. As a team of experienced professional plumbers in the Rochester New York area, we are committed to providing you with quality PEX pipe installation. For your PEX pipe installation needs, contact us, and we are here to help!